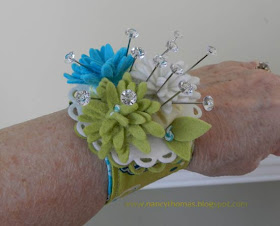
When I saw that the August My Favorite Things Guest Design Team challenge was Embellish Yourself (create something to be worn, accessory, etc), I knew immediately what I wanted to do for it. I've been wanting to make a wrist pin cushion for a while now. I visit quite a few sewing blogs on a regular basis (thanks to Google Reader) and had spied several versions that I liked. Yet somehow they never quite fit the vision I had for mine.
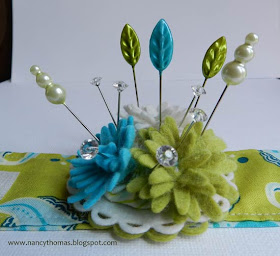
I started out by picking out fabric for the wrist band. If you must know I have a whole drawer of fat quarters to choose from! I then cut three flowers using the My Favorite Things Rolled Daisy Die-namic from different colors of felt and then rolled them up. I usually glue these when making for cards but this time I threaded a long needle with twine, inserted at the bottom all the way up through the flower center. I then made a french knot and inserted the needle back down to the bottom to secure it. I also cut two round felt pieces using a Spellbinders Nestie and a plain circle from another fabric. I sewed the fabric circle up yo yo style placing stuffing inside before closing up. I sandwiched one of the felt pieces, the stuffed fabric piece and the three felt flowers and hand sewed them together hiding my stitches underneath the felt flowers. I cut two leaves from the My Favorite Things Tree and Leaf Trio Die-namics, overlapped them and then sewed on with another french knot. I recycled some clam shell packaging to cut a round piece of hard plastic punching two small holes in the center with my Crop-a-dile (you need something hard between your skin and those sharp pins). I made the wrist band from fabric using fusible interfacing to create stability and attaching velcro for the closing. Finished measurements were approximately 8 1/2 inches in length and two inches wide.
The final step was to assembled the wrist pincushion by stacking the layers: fabric wrist band, plain round felt piece, hard plastic piece, the top flower piece createed earlier, and then sewed them all the way through to the wrist band back. I added touches of felt glue here and there to add even more stability. It would probably make more sense if I had taken photos as I assembled but frankly I consider this a prototype. I can already see ways to improve the process as well as the look of the design. A fun variation would be to use the My Favorite Things Rolled Rose Die-namics as well as the new one being released this month. I want to make several of these in different colors and give as gifts to my sewing friends.
The final step was to assembled the wrist pincushion by stacking the layers: fabric wrist band, plain round felt piece, hard plastic piece, the top flower piece createed earlier, and then sewed them all the way through to the wrist band back. I added touches of felt glue here and there to add even more stability. It would probably make more sense if I had taken photos as I assembled but frankly I consider this a prototype. I can already see ways to improve the process as well as the look of the design. A fun variation would be to use the My Favorite Things Rolled Rose Die-namics as well as the new one being released this month. I want to make several of these in different colors and give as gifts to my sewing friends.
Please note that when this is used as wrist pincushion there would be real sewing pins inserted, not these cute decorative pins! Those were for effect only!
So that's it. What do you think?


ACK! OMG Nancy! What an AMAZING idea and stunning execution!!! LOVE this! GENIUS idea!
ReplyDeleteNancy,
ReplyDeleteThis is the cutest idea! I wish I had a cute pin cushion like that one!
GET OUT OF TOWN, Nancy!!!! That is the most CLEVER AND CREATIVE project! I have no more words.....LOL!
ReplyDeleteFANTASTIC project, Nancy! You are SO clever! Great idea, and I just LOVE these colors together! Good luck with the contest! :D
ReplyDeleteWhat do I think?! Girl, I think you're a genius. Stunning and so clever for the guest designer contest. Good Luck!
ReplyDeleteSo pretty! I think you need one for sewing and one for scrapbooking. ;)
ReplyDeletebrilliant! absolutely fabulous! tfs!
ReplyDeleteabrazos,
bella
SO pretty!
ReplyDelete