The Purple Onion Designs annual holiday sale is in full swing. All stamps are 25% off.
Today's card features a bundled up snowman, Chilly from last year's holiday release. I stamped onto Copics X-Press It cardstock, colored with Copics and then fussy cut out. For the background I double layered a large snowflake cut from white and pool party cardstock and then layered another panel over it. The sentiment from the Essential Happy Sentiment set was stamped onto a dark blue cardstock banner using Versamark ink and then white heat embossed. The sentiment banner and image was attached with foam tape. Another double snowflake anchored with an enamel dot finished it up.
Products: Purple Onion Designs stamps, PTI, SU and Bazzill cs, MFT dies, Versamark and MFT ink, Copic Markers Copics: C00, C1, Y13, Y17, Y38, W00, E81, B41, B34, B45
As always you can see other projects at the Purple Onion Designs blogfor more inspiration. And of course, don't forget about the sale!
I hope you saw the surprise blog hop last Friday for our of Purple Onion Designs owner and all around great person Michele. If not you can start here. Today is the the last day to comment for a chance for some great prizes.
I have another Christmas tag for the 25 Day of Christmas Tags challenge that I have also placed on a card.
I was inspired by Elena's Day 12 tag. I loved the subtle colors with the punch of red and of course the sweet critter images.
I had a hard time deciding on a set but finally selected Lawn Fawn Snow Day since I had not used in a while. Those bunnies are just too cute anyway. I stamped the images, cut out with the matching dies and then colored with Copic markers. After cutting the tag from white cardstock using the Pretty Pink Posh Stitched Duo 1 die, I stamped a heart using soft stone ink and the sentiment over it plus the small hearts and snowflake using pure poppy ink. I created a snow bank with a scalloped edge die and attached with foam tape. After adhering the animal images, I tied gray and white twine in the tag hole.
To balance out the subtle colors in the tag, I decided to make a colorful background for it using fired brick and festive berries distress ink and water onto watercolor cardstock. After the panel dried I cut it with a wonky stitched die and added the completed tag.
Products: Lawn Fawn stamps and dies, Ranger, PTI and Neenah cs, Divine Twine, MFT, Pretty Pink Posh and Simon Says dies, Ranger Distress, PTI and MFT ink, Copic Markers Copics: C00, C1, C3, R20, R22, R24, R27
It has been a privilege to design for Michele at Purple Onion Designs as it is to participate in today's blog hop in her honor. Michele has been traveling up and down the east coast to help her family for several weeks while at the same time trying to conduct business. Tragically, she lost her father. My heart goes out to her during this extremely difficult time.
If you arrived from Susen Srb's blog you are right on track. If not, then start at the beginning at Sandy Allnock's blog.
In celebration of the hop, Sandy Allnock (who is the organizer of this blog hop) is giving away spotsin a class of their choiceto 3 lucky commenters along the bloghop - so be sure to comment everywhere! If the winner has already purchased a class during the current sale, that class fee can be refunded. Winner will be posted on Sandy’s blog on December 1. Good luck!
So on to my card today.
I masked off the snow globe portion of the Winter Friends image using washi tape, inked up the image, removed the washi and stamped onto a Neenah cardstock piece. I created a mask for the image and sponged around it with tumbled glass distress ink, colored the image with Copic markers and then cut out the panel with a stitched die. I stamped the sentiment from the Essential Holiday Greetings Sentiment set onto a red cardstock banner using Versamark ink and then white heat embossed. The sentiment banner was attached with foam tape. After attaching the panel to a grout gray card base, a couple of doubled up snowflakes were anchored by enamel dots.
Products: Purple Onion Designs stamps, Neenah and MFT cs, Doodlebug enamel dots, MFT, Simon Says and Reverse Confetti die, Ranger Distress, Versamark and MFT ink, Copic Markers
I have another Christmas tag for the 25 Day of Christmas Tags challenge that I have also placed on a card.
I was inspired by Melissa Bickford's Day 14 tag. I like that Melissa's tag was die centric with a sentiment although obviously my dies and colors are different.
I first cut a tag from blueberry cardstock using The Cat's Pajamas Holiday Window Duo die and then the nativity scene from textured white cardstock using the dies from the Concord & 9th Holy Night Bundle. The sentiment was stamped on the (Mary) layer using blueberry ink and I then layered the various die cuts onto the tag using foam tape on the front piece. I cut the star from gold mirrored cardstock and added gold thread in the tag hole.
Products: Concord & 9th stamp and dies, MFT, Bazzill and PTI, American Crafts cs, The Cat's Pajamas die, MFT ink
I'm back with another Christmas tag for the 25 Day of Christmas Tags challenge. This one was also used on a card.
I was inspired by Michele Ferguson's Day 4 tag. I really liked that Michele did not actually use a tag die for her base and luckily I had that same die set. Plus I never found a word die that I didn't like!
I cut the tag base from white cardstock using a die from the Reverse Confetti Lacy Scallop Frame set and added a red topper using a die from Hang Ups set. I sponged a bit of tumbled glass distress ink in the center. I stamped the moose and sign from the Merry Christmoose set, cut out with the matching dies and colored with Copic Markers. I stamped the partial sentiment directly onto the base and then added the word die cut from red cardstock using a die from the Winter Words set.
Products: Reverse Confetti stamps and dies, PTI and MFT cs, Sakura Gelly Roll pen, MFT ink, Copic Markers
It is release day for The Cat's Pajamas! Three new stamps and three new die sets are now available in The Cat's Pajamas shop. We are celebrating the release with a blog hop. If you arrived here from Michele's blog you are right on track. If not start at the beginning at Deborah's blog.
TCP Tuesday #341 is also going strong and it's a fun one to make a tag or include one on a card. We are also giving you some extra time due to the holidays so post away!
I used the Holiday Tag Duo set to cut a tag from the card front and then used the resulting tag to stamp the sentiment from Melt My Ice using new leaf ink. I cut the clock pieces from silver metallic, patterned paper and card stock using the various pieces from the new Clock CutUps and attached to the tag. After adding patterned paper to the tag cut out on the front of the card, I tied cord to the tag hole and attached to the card.
I am also submitting this tag for the 25 Day of Christmas Tags challenge. I was inspired by Kim's Day 19 tagwith it's simple focal point and sentiment. By the way, if you are participating in this challenge you can also link up to our challenge.
That's it from me. Check out all the details regarding this release and the ongoing TCP Challenge at The Cat's Pajamas blog. But before you hop on over to the oh so creative Julie, let me give you some great news! A sale which includes the new release!
I'm back with another Christmas tag for the 25 Day of Christmas Tags challenge. This one is also going on a card.
I was inspired by Flora Monica Farkas's Day 5 tag. I really loved the single image and sentiment direct to paper and of course that bit of plaid anchored at the bottom.
I cut one tag from patterned paper and another from white linen cardstock using the Papertrey Ink Tag Sale #10 die. I stamped the images from the Papertrey Ink Beautiful Berries: Winter set using pinefeather, pure poppy and soft granite ink and the sentiment in black. After adding a strip of patterned paper at the bottom, I tied the two tags together with maraschino twine.
For the card I added a matching patterned paper strip at the bottom and rounded the corners to match the tag.
Products: Papertrey Ink stamps and die, My Mind's Eye dp, PTI cs, The Twinery Twine, PTI, Simon Says and Hero Arts ink
Welcome to the The Cat's Pajamas Sneaky Peek Week! We have three new stamp sets and four new dies which will be released on November 21 in the TCP store. You've already seen some really great projects throughout the week from my fellow design team members Michele, Lynn, Wendy, BrendaandJulie. Today Deborah and I are the featured designers.
First up is a simple Valentine card using the new Sent with Love set. This really is the cutest set full of sweet sentiments and images. I first stamped the small winged envelopes directly onto the card front using london fog ink and a bit of masking and then colored with Copic markers. I stamped the sentiment also directly onto the card front using pure poppy ink. I added two strips of patterned paper as a border at the bottom. I used the smallest die from the Square Stamps CutUps to cut from the same pink patterned paper in the border plus two plain white, stacked them together and placed over the stamped images.
Products: The Cat's Pajamas stamps and dies, Doodlebug dp, PTI cs, Memento and PTI ink, Copic Markers
Copics: R22, R27, R91, R93, W00, E81
My second card is New Year themed. I cut a tag from Neenah cardstock and silver and gray metallic cardstock using one of the dies from the Holiday Window Duo CutUps. After stamping the image from the new Time Out set I colored with Copic Markers, adding a scattering of sparkly enamel dots. I stamped the sentiments from the new Happy set using directly to the card front using silver shimmer and black ink. After tying the two tags together with twine, I attached to the card front. This card sparkles a lot more than my camera picked up.
Products: The Cat's Pajamas stamps and dies, Neenah, PTI and American Crafts cs, Doodlebug enamel dots, Hemptique twine, MFT, Simon Says and Delicata ink, Copic Markers
Copics: E40, E41, E43, E44, W00, E81, C00, C1, C3
One of the hardest cards to make for most designers is a sympathy card and I am no exception. I have found over the years that keeping it simple seems to work best. That works out fine for me as my style is CAS anyway. So with that it mind, I did a simple watercolored background using faded jeans distress ink onto an Arches water colored panel cut with a stitched die. While it dried I cut the angel wings using the new Wings die set which cuts and embosses at the same time. I cut first from a subtle patterned paper and then cut again from card stock and stacked them together for stability. I stamped the sentiment from the Simply Said set which still remains one of my very favorite sentiment sets using black ink. I attached the wings to the panel using foam tape. A few enamel dots finished it up.
Products: The Cat's Pajamas stamps and dies, Glitz Designs dp, Arches and PTI cs, Doodlebug enamel dots, Ranger Distress and Simon Says ink
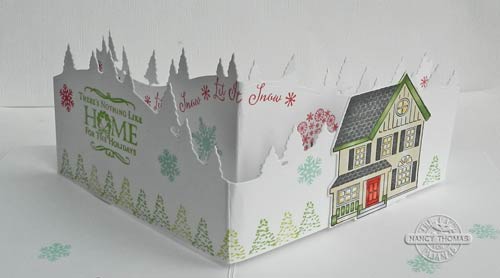
My last card features the new Corner PopUp die. On the outside it looks just like any other card. The inside is where it gets interesting. I combined this awesome die with formerly released Hill and Dale dies to create the popped up layers. Before attaching to the pop up pieces I stamped the sentiment from the Penguin Joy set along the top of the using red poppy ink and a scattering of snowflakes from the same set in red poppy and aqua mist. I then stamped the tree from the Home for All Seasons set using red poppy and dark chocolate. For the front layer I stamped rows of trees also from the Home for All Seasons set using green parakeet and new leaf ink as well as the sentiment in new leaf plus more snowflakes from the Penguin Joyset. I stamped one of the houses from Home for All Seasons set onto Copics X-Press It cardstock and cut it out with a matching die from the Village CutUps set. After coloring the image with Copic markers, I attached to the front layer. To complete the inside the stamped the penguin angel and more snowflakes randomly, all from the Penguin Joyset. Below is a video showing you how to use the Corner PopUp.
For the card front, I stamped the Round the Chimney image (an oldie but goodie set) and the mantle portion of the image again onto Copics X-Press It. I colored both portions with Copic markers, fussy cut out and then attached the mantle portion to the whole piece with foam tape. After stamping the sentiment with pure poppy onto a patterned paper piece cut with a pierced die, I attached the colored image with foam tape. I added a patterned paper background to the card front, attached a snowflake cut with the smallest die from the Double Snowflake CutUpsand then attached the stamped panel.
Products: The Cat's Pajamas stamps and dies, Simple Stories and Lawn Fawn dp, Bazzill and PTI cs, MFT, PTI and Simon Says ink, Copic Markers
For a chance to win a $10 gift certificate to the store, comment on each of the designer's blogs on a daily basis including mine and Deborah's today and also on our Instagram account @nancyhthomas and @Beadnstampn. Winners will be announced on The Cat's Pajamas Blog and Facebook page each day. Be sure to stop by Jessie's blog tomorrow for the last day of sneak peeks but of course you can always check the TCP blog to see who is scheduled each day.
I have been wanting to participate in the 25 Day of Christmas Tags challenge for a while now but it's been both busy around here with both personal things as well as design team work. So, here I am with my first one 18 days after the challenge started! I also desperately need more Christmas cards so I am adding today's tag to a card.
I was inspired by Kay Miller's Day 13 tag. I mean really, who isn't inspired by Kay's creativity?!
I cut a tag shape from white card stock using the Pretty Pink Posh Stitched Duo 3 die then used a stencil as Kay did on her tag using berrylicous ink. I stamped the sentiment directly onto the tag then added a topper in hawaiian shores and a strip at the bottom cut from patterned paper using a small scalloped die. I then stamped all the images from the Neat & Tangled Holiday Baking set, cut out with the matching dies and attached to the tag. Twine in the tag hole finished it up.
Products: Neat & Tangled stamps and dies, PTI dp and cs, The Twiner twine, PTI stencil, Pretty Pink Posh and Simon Says dies, MFT ink, Copic Markers Copics: Bear-W00,E81, E40, E41 E42, R20, Dishes=YG21, YG23, YG25, R20, R22, R24, Pie Crust-E50, E51, Dough-W00, E81; Mice-W00, E81, R20; Rolling Pin-E30, E31, R20, R22, R24
You have just a couple of more days (until November 19) to purchase the entireTwas The Night Before Christmas collection of 22 stamps at a discounted price of $95.00. This is almost a 30% savings. You can purchase the complete collection by clicking here.
I stamped the new Gathered Pumpkins onto Neenah cardstock, masked them and then stamped Old Betsy (truck). I colored with Copic Markers and then added a kraft strip of card stock at the bottom and stamped the sentiment from the Essential Happy Sentiment set using potter's clay ink. I broke out an old patterned paper pad stamping the pumpkins from the Door Decor set onto a solid vertical strip also using the same potter's clay ink. I added a stitched leaf cut from kraft card stock and edged with vintage photo distress ink and cappuccino twine at the top.
In accordance with the FTC 16 CFR Part 255, The Cat's Pajamas and Purple Onion Designs have generously supplied me with complimentary and/or discounted products for promotional purposes.
Blog Design By
Using elements from Certainly Fresh by Cori Gammon.