Monday, December 31, 2018

Favorite 2018 Projects

Although I did not create as many projects this year as in previous ones I am still very much engaged in cardmaking. I love stamps and paper and coloring.


As you probably know, Instagram seems to be going stronger than blogs these days. Here is the top "likes" according to Best 9.

And these are my favorite 9 projects created during 2018. As it should be, my design teams feature prominently in my favorites, The Cat's Pajamas and Purple Onion Designs.


I hope you have a happy and safe New Years celebration. And let's make 2019 a creative, happy and blessed year. 

 photo signaturecopy_zpsn7wywovz.png

Monday, December 24, 2018

Have Yourself a Merry Little Christmas


Today's card features stamps from the Hello Bluebird Christmas is Coming set. After stamping all the images onto Neenah cardstock, I cut out with the matching dies, then colored with Copic Markers. The sentiment was stamped in vermillion ink onto a stitched circle which in a way also represents a full moon. To prepared the background I used a stencil and embossing paste onto navy cardstock to represent snow (which I realized after I photographed the completed card was a little too much.) The snow bank was cut using another die. I assembled the group of animals and the sentiment on the background panel of which some were attached with foam tape.

Products: Hello Bluebird stamps and dies, MFT, PTI and Bazzill cs, MFT stencil, Lil Inker Designs die, Ranger and Altenew ink, Copic Markers
Copics: Bear with Tree-E50, E51, E53, B41, B32, B34, G40, G43, E31, E33, E37; Fox-W00, E81, E13, E15, E97, E99, R22, R27, Y35, Y35; Badger (?)-W00, E81, W1, W2, W5, BG0000, BG000, BG01; Bunny/Gift/Sled-W00, E81, R20, R22, R24, R27, R81, R83, YG01, YG11, YG13, B41, B32, B34; Sitting Bird-R20, R22, R24, BG0000, BG000, BG01; Flying Bird-B41, B32, R20, R22, R24

May you all have a blessed Christmas filled with faith, family and friends.

 photo signaturecopy_zpsn7wywovz.png

Thursday, December 20, 2018

Santa Paws

is coming to town!


I had a head start on this card as I had colored the images last year but never got around to using them. The images from the Happy Pawlidays set were stamped onto Neenah cardstock, cut out with the matching dies then colored with Copic Markers. To prepare the background I sponged a bit of tumbled glass distress ink onto the card base, then added a strip of metallic gold cardstock and a patterned paper border at the base of the card. I stamped the sentiment onto a stitched double ended flag and after adhering it I added the two stamped images using foam tape for dimension. A few sparkly enamel dots finished it up. I have to say that I have really enjoyed this set as I have quite a few dog lovers on my Christmas card list. I used an MFT sketch from a couple of weeks ago for the layout.

Products: My Favorite Things stamps and dies, Doodlebug dp, Michael's metallic cs, PTI and MFT cs, Doodlebug enamel dots, Ranger and MFT ink, Copic Markers
Copics: Dog-E40, E41, E42, E44, N1, N3; Hat-W00, E81, R20, R22, R24; Collar-B21, B23, B26; Tree-YG11, YG13, YG23, N1, N3; Star-YR31, Y35; Ornament-R20, R22, R24; Lights-B000, B01, YG11, YG23, YR31, Y35, R22, R24


For the second card I stamped the image from Santa & Friends onto Neenah cardstock, cut out with the matching die and colored with Copic markers. I also stamped and colored again cutting it out with the same die and trimming off the side the deer portion so I could add more dimension by stacking with foam tape. Santa is cute but he kinda looks like Mrs. Claus put him on the Keto diet this year! After cutting out a circle in a patterned paper panel, I backed the cutout with a piece that was stamped using the Christmas Background stamp. After attaching to the card base, I attached the stamped image with foam tape. The sentiment was stamped using vermillion ink and I added the small holly and berry images at each end, colored with Copics and attached using foam tape. I used a clear gelly roll pen on Santa's boots and gloves and liquid pearls on the reindeer's nose and the berries on the sentiment piece. A few enamel dots finished it up. I used last week's MFT challenge sketch for the layout.

Products: My Favorite Things stamps and dies, Lawn Fawn dp, Doodlebug enamel dots, Sakura Gelly Roll pen, Ranger Liquid Pearls, Altenew ink, Copic Markers
Copics: Reindeer-W00, W1, W2, W5, E31; Santa-W00, E81, R20, R22, R24, R27, N1, N3, N5

Counting down the hours to the big day. Or big days for us (you too probably). We will spend Saturday in one city, two days in another and then back home late Christmas Eve to spend Christmas day at home.

 photo signaturecopy_zpsn7wywovz.png

Monday, December 17, 2018

Not a Creature was Stirring {Purple Onion Designs}

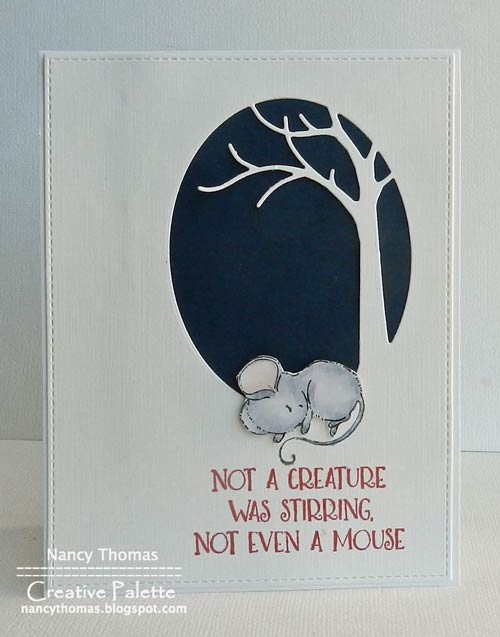
not even a mouse.....

I begged Michele at Purple Onion Designs for this sentiment. She was sweet and accommodated my request.


This Christmas card features the ever so sweet sleeping mouse Eve illustrated by Stacey Yacula. You can also find it at Simon Says Stamps here. I used the Simon Says Bare Tree Oval die to create a cut out in a stitched linen panel and stamped the sentiment directly onto the panel using vermillion ink. The mouse was stamped onto Copics X-Press It cardstock, colored with Copic markers and then fussy cut out. I also stamped the mouse onto the background panel so I would not have to cut out the tail then attached my colored mouse onto the panel using foam tape. I am submitting this to the Simon Says Wednesday Christmas Challenge.

Products: Purple Onion Designs stamps, PTI cs, Simon Says die, Ranger and Memento ink, Copic Markers
Copics: C00, C1, C3, R0000, R30


My second card features more little creatures illustrated by Stacey Yacula. I cut a stitched oval from Neenah cardstock and then stamped Mabel and Pepper onto to it and colored with Copic makers. The sentiment from the Holiday Marquee Sentiment Set was stamped directly onto the soft stone card base using vermillion ink then the image piece was attached using a layer of craft foam. 

Products: Purple Onion Designs stamps, PTI cs, MFT die, Ranger and Memento ink, Copic Markers
Copics: Bird-W00, E81, YR31, B41, B32, R20, R22, R24; Bunny-E40, E41, E42, E44, W00, E81, R0000, R32, G000, G00, G01; Gifts-YG01, YG23, BG10, BG11, BG13, R20, R22, R24; Snow-C00, C1; Sky-BG0000, BG000


The third card features yet another Stacey Yacula illustrated critter. I had a head start with this one as the image was stamped and fussy cut out last year and never used. The image is Hope and she was colored with Copics and then fussy cut out. I also had the background piece in my stash as a reject for a recent project. It's been laying on my desk for a few weeks and a light bulb went off when I discovered the image. I layered together the patterned paper and textured white card stock and then cut out using an ornament shape. The sledding bunny was attached with foam tape and tied at the top with with twine. For the background I cut another piece from patterned paper using a stitched rectangle die and stamped the sentiment from the Sweet Occasions Sentiment set directly onto the patterned paper panel using green parakeet ink. A trio of enamel dots added a bit more color.

Products: Purple Onion Designs stamps, Lawn Fawn dp, PTI and Bazzill cs, MME enamel dots, The Twinery twine, PTI die, Memento and PTI ink, Copic Markers
Copics: Bunny-E40, E41, E42, R00, R20; Scarf-YG01, YG21, YG23, B41, B45; Sled-E21, E23, E25. W00, C7, R24


For the fourth card I stepped away from the cute critters to an adorable Stacey Yacula illustrated snowman. After stamping Snowflake onto a Neenah cardstock I cut out with a pierced circle die eliminating some of the image at the bottom, then colored with Copic markers. The background panel was cut from white textured cardstock with the Reverse Confetti Big Stripes Cover Panel die and attached to a pure poppy base. The sentiment from the Snowflake Grove Sentiment set was stamped in vermilion. I had colored the small stocking from the Fireplace Decor set earlier thinking I would use it on the first card. I changed my mind on that but I thought it was sweet for the snowman like he just snatched that oversized candy cane out of it so I attached it to his arm at the last minute. A mix of tiny heart and round enamel dots finished it up.

Products: Purple Onion Designs stamps, PTI and Bazzill cs, Doodlebug enamel dots, Reverse Confetti die, Memento and PTI ink, Copic Markers
Copics: W00, E81, YR01, YR16, E30, E33, G000, G000, G00, G02, N1, N3, N5, R20, R22, R24, BG0000, BG000


My last card is one I did during the Mistletoe Farms release week but failed to post on my blog. I think mostly because it was just not a favorite. I stamped the Presents onto a wonky stitched Neenah cardstock rectangle and colored with Copic Markers. The sentiment from the Holiday Marquee Sentiment Set was stamped directly onto the panel using pure poppy ink. The Farm Wagon was stamped onto Copics X-Press It cardstock, colored with Copic markers, fussy cut out out then added to the panel using foam tape for extra dimension. Lot of highlights using a Sakura Gelly Roll white pen was used on both images and a clear Sakura Gelly Roll pen was used on the presents "silver" wrapped presents and all the ribbons. The image panel was attached to a patterned paper background.

Products: Purple Onion Designs stamps, Doodlebug dp, PTI cs, Paper Source twine, MFT dies, PTI and MFT ink, Copic Markers
Copics: Wagon-C00, C1, C3, R20 R22, R24, R27, N1, N3, N5; Presents-YG23, YG25, C00, C1, C3, BG0000, BG000, BG01, R20, R22, R24, R27


I hope you enjoyed all my Purple Onion Designs projects.

 photo signaturecopy_zpsn7wywovz.png

Thursday, December 6, 2018

Christmas Wrap and Tags {Purple Onion Designs Annual Holiday Sale}


Well hello there. I am back with more Purple Onion Designs projects. The sale ends tomorrow and you need to get in on it for sure! 


I am using another big set that I've actually used pieces before but not these particular images. I created Christmas tags using images from the Merriness Set which is another big set with such great iconic Christmas/Winter images. I cut the three tags from Neenah cardstock and stamped the three different tree images onto them and colored with Copic markers, using a gelly roll pen on the tree topper stars for a it of sparkle. I also cut the same size tag from red, green and aqua patterned paper and also tiny tags from iced aqua cardstock where I stamped the "to". I offset the patterned and image tags and added the tiny tags anchored by either a tiny clothespin or paper bows. For the green and red tag I stamped the snowflakes from the set using silvery shimmer ink. For the red tag I added red liquid pearls for the berries on the tree. A silver metallic snowflake was attached to each tag all anchored with a flat backed pearl. 


I purchased some white kraft paper from Amazon manufactured by Current this summer with the vague idea that I wanted to do my own patterned paper for a few gifts. Not for big boxes but for the smaller gifts and certainly not for all of them. I'm not that crazy! I found it easier to plan a design by first loosely wrapping the paper around the box creasing the edges for guidance. I then stamped the Have the Merriest Christmas Ever sentiment using iced aqua ink repeatedly. I tried to remember that it was homemade and therefore did not have to be perfectly lined up. 

Products: Purple Onion Designs ink, PTI dp, Reverse Confetti cs, Current kraft paper, American Crafts metallic cs, Ranger Liquid Pearls, Sakura Gelly Roll pen, Mama Elephant, Lawn Fawn and Waffle Flower dies, Delicata, Reverse Confetti and Memento ink, Copic Markers
Copics-G40,G43, BG10, BG11, BG53, W1

Be sure to stop by the Purple Onion Designs blog for more inspiration and of course you need to shop!

 photo signaturecopy_zpsn7wywovz.png