Wednesday, February 23, 2022

Eastertime {Picket Fence Studios)

The Picket Fence Studios latest release is all about spring and Easter and I have two cards to share with you today. 


I stamped one of the cute images from the Eastertime set, one onto a die cut circle and the two small chicks using the Picket Fence Black Hybrid Ink Pad which were then cut out with the matching dies. All the images were colored with Copic Markers and the main image was then framed with a scalloped circle cut with the larger scallop frame from the Slim Line Scallop Frame Dies set. The chick diecuts were placed onto a small circle die cut which was framed with harvest gold cardstock cut with one of the Misshapen Stitched Circle Dies

The shaker was created with a backing of pattered paper and several layers of cardstock cut with the smaller scallop frame from the Slim Line Scallop Frame Dies and filled with pieces from the Penny and Henny Sequins Plus Mix. I cut the card front border using the Ornate Negative Strip Die and backed with the green parakeet cardstock. I added a small strip at the top of the cut out to complete the border, then attached all the circle pieces. 

Products: Picket Fence Studios Stamps and Dies, Doodlebug dp, PTI cs, Picket Fence Studio sequins, PTI and Picket Fence Studios ink, Copic Markers
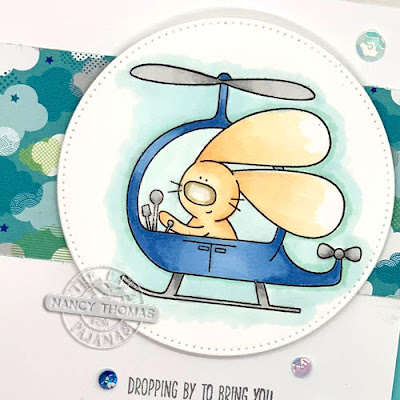
Copics: W00, E81, Y000, Y00, Y21

For the second card, I stamped the bunny from the Hoppin' Down the Bunny Trail directly onto the card front using the the Black Hybrid Ink Pad and colored with Copic markers. I then masked the image in order to blend tumbled glass and broken china ink around it using the Life Changing Blender Brush SetI also stamped the main image from the Hippity Hoppity to All stamp set and cut out with the matching dieAfter coloring with Copic markers, I cut it down to fit the A2 portrait card front. It was attached using a layer of craft foam. For the sentiment, I used the inlaid die cut technique using matted wortd die from the Hippity Hoppity to All Die set and then attached over the bunny ears with craft foam. 

Products: Picket Fence Studios stamps and dies, PTI and SU cs, Picket Fence Studios and Ranger Distress ink, Copic Markers
Copics: Bunny-W00, E81, R00, R02, R05, BG10, BG11, BG13; Grass-G20, G21, G24; Eggs-BG41, BG32, RV0000, RV11, R81, Y0000, Y000, Y00, BV000, BV02, BV04, BG10, BG11, BG13

Have a great rest of the week. Thanks for stopping by. 

My Sale Page

photo signaturecopy_zpsn7wywovz.png

Monday, February 21, 2022

Cooking Up Some Sweets

I created these treat packages for the ladies in my small group at church prior to Valentine's Day and completely forgot to post them earlier. 


I used The Greetery Bake Someone Happy Die and the Bake Someone Happy Stamp set to create these cute little ovens. These were actually a Christmas release but I thought they would make sweet Valentine packages also. I created them assembly style to help cut out down on the creating time.


I filled them with some heart shaped Dove dark and milk chocolates. 


All the cookies and candy on the cookie tins came from the Baked Bits tin. 

Products: The Greetery stamps and dies, PTI and SU cs, The Greetery embellishments, PTI ink

I really don't think I will be making these again so I am putting the die and stamp set on my sale page. (Update: this particular set is now sold)

photo signaturecopy_zpsn7wywovz.png

Wednesday, February 16, 2022

Sending You {The Cat's Pajamas}

The Sending You stamp set was one of my favorites in its physical form so I was excited to see the digital version released. 


I printed the image onto Copic and printer friendly cardstock, cut out with a pierced circle die and then colored with Copic markers. I added a strip of patterned paper and attached the image piece using a layer of craft foam. Since my Amazon order had not come in I only had black in my printer, I used the physical stamp to stamp the sentiment using london fog ink. BTW, I still have all my TCP stamps and dies. A few sequins finished up this clean and simple card. 


Products: The Cat's Pajamas digi stamps, Doodlebug dp, Picket Fence Studios sequins, Memento ink, Copic Markers
Copics: Bunny-E50, E51, E53, W00, E81; Helicopter-B21, B23, T0, T1, T3; Sky/Shadows-BG0000, BG10

Have a blessed day! Thanks for stopping by.

photo signaturecopy_zpsn7wywovz.png

Monday, February 14, 2022

February 2022 Release Day {Picket Fence Studios}

It's release day at Picket Fence Studios and my first release as a design team member. I could not have picked a better time to start as it's all about spring and Easter. I think everyone in the Northern Hemisphere is ready for spring! I have several projects to show you so here goes....

After stamping the sweet image from the Bunny Dear set using the Picket Fence Black Hybrid Ink Pad I cut out with the matching die and colored with Copic markers. For the background I blended bundled sage and worn lipstick distress oxide inks onto distress cardstock using the Life Changing Blender Brush Set and added a patterned paper border strip. The sentiment was white embossed onto black cardstock and also cut out with the matching die then surrounded with a few pieces from the Yellow and Orange Hearts and Flowers Sequin Mix Plus


Products: Picket Fence Studios stamps and dies, Altenew dp, Master's Touch watercolor cs, Picket Fence Studios Sequin Mix, Ranger Distress Oxide and Picket Fence Studios ink, Copic Markers
Copics: Skin-E000, E00, E01, E11, R20; Hair-E30, E33, E35; Flowers-Y0000, Y000, Y00, Y21; Dress-R00, R02, R05, W00, E81; Bunny-W00, E81, R0000, RV10, R81; Egg-R0000, R81, YR02, YR04

For my second card, I stamped the oh so cute bunnies and the watering can from the Chloe's Garden set onto Copic friendly cardstock using the Black Hybrid ink pad, cut out with the matching dies and colored with Copic markers. To create the background I cut a circle in a layer of white cardstock and craft foam. I blended tumbled glass distress ink around the opening using the Life Changing Blender Brush set and attached to the card base. The shaker was filled with pieces from the Carrot Patch Sequin Mix Plus then covered with a piece of acetate and framed with a piece cut with a die from the Slim Line Stitched and Scalloped Rectangles and Alpha Die Cutting System. To make the border, I blended new leaf ink onto a green parakeet cardstock piece using the Flowers and Polka Dot Fun 6x6 Stencil. Lastly I attached the stamped images, a couple of clouds cut with the Cloud Dies and the sentiment from the More Fancy Sentiments set cut with the matching die


Products: Picket Fence Studio stamps, dies and stencil, PTI cs, Picket Fence Studios sequins, PTI, Ranger Distress and Picket Fence Studios ink
Copics: Bunny (girl)-E40, E41, E42, R00, R02, Y00, Y21, RV10, R81, R83; Bunny (boy)-W00, E81, R00, R02, C00, C1, C3, B91, B93; Watering Can-Y00, Y02, Y21, R05


For this faith based card, I used the new Three Crosses of Calvary die to cut from dark gray cardstock then stamped and white embossed the sentiment from the Every Good and Perfect Gift set onto it. The background was simply done by using the Life Changing Blender Brush set and the Slim Line Cloud Coverage Stencil to blend harvest gold, pink peony and blueberry sky ink to create a morning sky. The diecut was attached using a layer of craft foam and lastly I added some sequins from the Rainbow Sequin Mix


Products: Picket Fence Studios stamps, dies and stencils, PTI and Simon Says cs, Picket Fence Studios sequins, PTI and Versamark ink

Can you tell how much I love the sequin mixes? And oh my, that ink pad is amazing. I will have more projects to show you using this release a little bit later. Have a blessed day!

photo signaturecopy_zpsn7wywovz.png

Thursday, February 10, 2022

Happy Birthday Nicole! {Picket Fence Studios}

This is my first post for Picket Fence Studios as a design team member which also coincides with the owner Nicole's birthday. Mostly my work has been in preparation for the February release (coming soon) so for this post I dug into my very generous starter box for the beautiful Soar Butterfly Stencil


I first sprayed the back of the stencil with Pixie Spray then positioned over a white cardstock piece. A little birdie told me that Nicole likes green so I used the Life Changing Blender Brush Set to blend blueprint sketch, dark indigo, tropical teal and lastly with green leaf ink then cut out with a stitched rectangle die. The sentiment from the Fancy Sentiments set was stamped onto a white cardstock strip using Versamark ink, then lime green heat embossed. I finished it up with a few strategically placed Gradient Flatback Pearls (Grass Green & Soft Copper).

Products: Picket Fence Studios Stamp, Stencil and Pearls, Michael's embossing powder, Versamark, Ranger Distress and PTI ink


Happy Birthday Nicole! Thank you for your generosity and talent!

photo signaturecopy_zpsn7wywovz.png