Monday, January 30, 2023

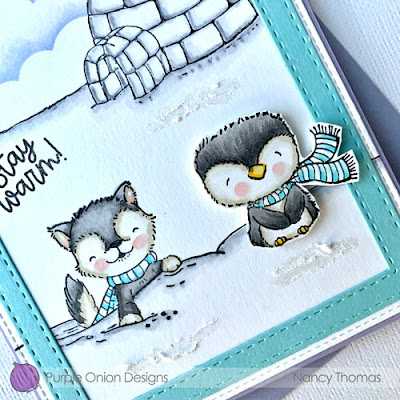
Stay Warm! {Purple Onion Designs}

I only got to make a few projects using the A Little Christmas Magic collection by Purple Onion Designs (illustrated by Stacey Yacula) that came out this past fall. As soon as my design team package arrived, I found out I needed retina surgery. In the midst of all that I beloved aunt became very ill and passed away after a few weeks. It's a good thing that Michele is so understanding.


Christmas may be over but winter is definitely not so I decided to make a winter wonderland card combining one of the new images with some older ones. I stamped Bluster (husky) onto a card front and also the Igloo, using a Copic Multi-Liner pen to draw the rest of the landscape lines. I used a mini cloud edges stencil and blended on shaded lilac distress ink for the sky, then colored the panel with Copic markers. I stamped Frost (penguin) separately, colored with Copic markers I fussy cut out. I stamped the sentiment from the Furry Friends Sentiment Set directly onto the panel, then cut out with a stitched edge die. I topped it with a berrylicious cardstock frame, then attached the panel to a wisteria card base. I used my finger add snowdrop white paper glaze for some snowy texture and attached the penguin image using foam dimensionals. 

Products: Purple Onion Designs stamps, PTI and MFT cs, PFS Paper Glaze, MFT stencil, MFT and Simon Says dies, Ranger Distress and Altenew ink, Copic Markers
Copics: Igloo/Snow Drifts-C00, C1, C3; Dog-W00, E81, T1, T3, T5, T7, R01, B0000, B000, B01; Penguin-Same as dog plus Y13, Y17

Have a great week!


photo signaturecopy_zpsn7wywovz.png

Friday, January 27, 2023

Merry Christmas

Todays card is my first Christmas card for the new year. 


I die cut the various pieces from the Spellbinders Folk Song set from red and white cardstock and assembled them to form the sweet bird. I prepared the background by dry embossing a pink background piece with the Fan Motif November 2022 Embossing Folder of the month, then smoothed it out some by cutting it with a stitched edge die. I used the Mini Christmas Greetings Stamp and Die for the sentiment stamped with cherry kisses ink. 

Products: Spellbinders stamps and dies, The Stamp Market, Bazzill and PTI cs, Spellbinders embossing folder, The Stamp Market ink

I am submitting this for the Color Hues (#56) Challenge.  


Have a great weekend. 

photo signaturecopy_zpsn7wywovz.png

Wednesday, January 25, 2023

Tankful for You {Picket Fence Studios}

Good morning crafty friends. This is my last post for Picket Fence Studios as of the end of this month I will have finished my design team term. Of course I will continue to use their fabulous products as I have many favorites from their stamp/die/stencil/paper glaze lineup. 

First I did some two step stamping on three of the fish from the new O-fish-ally stamp set from the January release using cheeky/pucker, seafoam/ocean and celery/pearfection inks. All were cut with with the matching dies. I also cut pieces from the ireviously released Layering Flora: Leaves and Twigs die set from various colors of cardstock to represent ocean floor seaweed and other flora. For the background I masked off the upper portion and used a brush from the from the Life Changing Blender Brushes to blend on antique linen distress ink to represent the ocean floor or the bottom of a fish tank. I then partially stamped the new Scene Building:Sand using kraft ink. After masking again, I blended on seafoam ink to represent water and stamped the Sand image using surf ink. I assembled the scene then attached the sentiment from the O-fish-ally set which was stamped using surf ink and cut out with the matching die.  

Products: Picket Fence Studios stamps and dies, PTI cs, Simon Says and Ranger Distress ink

I hope you like this simple but colorful underwater scene. 

photo signaturecopy_zpsn7wywovz.png

Monday, January 23, 2023

Thinking of You {Purple Onion Designs}

Good morning. My stepdaughter has asked me for thinking of you, get well and sympathy cards for her business so I am trying to get some together for her. Today is one such card using Purple Onion Designs stamp illustrated by @staceyyacula


I stamped the Floral Spray image onto Copic friendly cardstock, colored with Copic markers, then fussy cut out. I trimmed off the left edge to match the card edge. Before attaching to the linen cardstock card base, I added a cardstock border at the bottom. I also added the partial piece I trimmed off by slipping underneath the main image. I stamped one of the greenery images from the Floral End Notes set directly on the card front and colored with Copics. The bird Peep was also colored with Copics and fussy cut out and attached using foam dimensionals. This sweet bird has been around for a long time but continues to be a favorite. I think I actually purchased it before I was on the design team. The sentiment came from a Spellbinders set. 


Products: Purple Onion Designs stamps, PTI and MFT cs, Altenew ink, Copic Markers
Copics: Bird-B000, B00, B01, W00, E81, Y21; Greenery-G40, G21, G24; Flowers-Y000, Y13, Y21; R0000, R20, R21, R22; BV000, BV01, BG0000, BG000, BG01


Have a blessed week!

photo signaturecopy_zpsn7wywovz.png

Thursday, January 19, 2023

Soar Butterfly {Picket Fence Studios}

Today's card is another one using products from the January Picket Fence Studios release.


I folded a piece wisteria cardstock, then used the new Soar Butterfly Die mat die to create a butterfly shaped card. I then used the butterfly cut out to cut twice from light pink textured cardstock and also one layer of acetate from the ShakerSheets package using the mat die again. The two pink die cuts were glued together and then backed with the acetate piece. I created a "faux" shaker by adding spots of glue to the card base and randomly placing sequins from the new Butterfly Bush Sequin Mix. The sentiment came from the Done Adulting for the Day and was stamped using Wisteria ink and cut out with the matching die

Products: Picket Fence Studios stamps, dies and sequins, MFT and Bazzill cs, Simons Says ink


Later friends. Have a blessed day!

photo signaturecopy_zpsn7wywovz.png

Tuesday, January 17, 2023

Flit Butterfly {Picket Fence Studios}

Good morning. I have another card using the January Picket Fence Studios release.


This release has some amazing stencil and die combos which produce the most beautiful butterflies. I used the Layered Flit Butterfly Stencil to blend spiced marmalade and dried marigold for the main butterfly body using brushes from the Life Changing Blender BrushesI then used the second layer of the stencil to blend black ink onto the wings. I cut out with the matching Flit Butterfly die as well as a few tiny butterflies from the same set. I partially blended on the new Raw Kale Paper Glaze using the previously released Slim Line Trapezoid Spiral Stencil onto a stitched edge spring rain cardstock The sentiment came from the More Fancy Sentiments set and was cut out with the matching die, attached to the card panel using foam dimensionals as was the butterfly. To finish it up I added a trio of the tiny butterflies around the sentiment.

Products: Picket Fence Studios stamp, dies and stencil, PTI cs, PFS Paper Glaze, PFS ink

Don't you just love butterflies?

photo signaturecopy_zpsn7wywovz.png


Saturday, January 14, 2023

Picket Fence Studios January 2023 Release


It is release day at Picket Fence Studios and we have some really fun products that are available for purchase now.

We are celebrating the release with an Instahop on Instagram. If you want to participate in the Instahop start @picketfencestudios. There is a fabulous prize in play so be sure to check it out. You have until Tuesday, January 17, 2023 at 11:59 CDT to participate. One winner will be randomly selected and announced on Wednesday, January 18th, 2023 on the @picketfencestudios Instagram Account.


I used the new Ocean View insert die to cut the opening from a white linen stitched edge rectangle and also used it for partial cuts from spring rain and bright buttercup cardstock to fill in the openings and then added some easy Copic coloring to the sun rays. The two small dolphins from the new Even More of a Fishy Lot were stamped onto Copic friendly cardstock, cut out with the matching dies and colored with Copic Markers. The sentiment was stamped onto spring rain cardstock and also cut out with the coordinating die. The images and sentiment were attached to the card front with a layer of craft foam. A few sequins from the new Sea of Dolphins Sequin Mix finished up this clean and simple card.

Products: Picket Fence Studios stamps and dies, PTI cs, PFS sequins, Copic Markers


For this card, I specifically had in mind my step granddaughter who recently entered the transfer portal and subsequently received a full ride academic and athletic (soccer) scholarship to Loyola University in Baltimore. The school colors are gray and dark green and although you can't tell from the photo the card base is soft stone. I stamped the new The Finish Line using the Black Hybrid Ink Pad on the card front of a side folding landscape card base, then trimmed off the edge to follow the diagonal finish line. I cut a 1x4.25 strip from dark green cardstock and stamped the small image using Versamark ink and white heat embossed and adhered onto the inside edge. I then stamped the sentiment from the also new Tact vs Sarcasm sentiment set using Versamark ink onto the same dark green cardstock, white heat embossed and attached with a foam dimensionals. 

Products: Picket Fence Studios stamps and dies, PTI and The Stamp Market cs, PFS and Versamark ink

Thank you for stopping by my little corner. Now go to @picketfencestudios to start the Instahop.

photo signaturecopy_zpsn7wywovz.png

Friday, January 13, 2023

{The Cat's Pajamas} Happy Birthday

I have a sweet birthday card today featuring the One Present digital stamp from The Cat's Pajamas


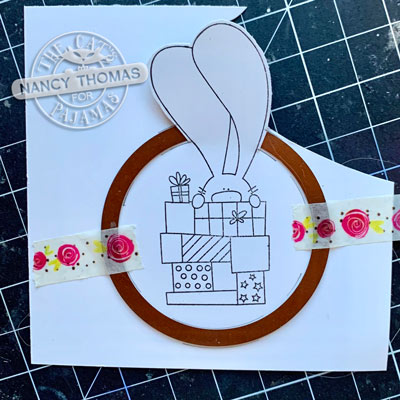
I printed the main image onto Copic friendly cardstock using Silhouette Software. I then used an older Spellbinders die to do some "outside the circle" die cutting so that the bunny ears fall outside the bounds of the circle. It had been so long since I had done this, I had to re-learn how. Below is just a quick snapshot taken on my craft table on a really dark day.


I colored with a variety of colorful Copic markers. I placed this image onto a patterned paper and cardstock background onto which the sentiment was printed. 

Products: The Cat's Pajamas digital stamps, MFT dp, PTI cs, Copic Markers
Copics: Bunny-E50, E51, E53, W00, E81; Gifts-R20, R22, R24, B0000, B000, B01, B02, YG01, YG03, YG13, Y000, Y13, Y17, YR00, YR01, YR02


You have until tomorrow to take advantage of the 30% off sale, even on the newest products.

photo signaturecopy_zpsn7wywovz.png

Wednesday, January 4, 2023

A Hug from Me to You {Picket Fence Studios}

Good morning. I am transitioning out of Christmas card mode to the next big holiday of Valentine's Day with today's card.


After stamping the new Picket Fence Studios Flow of Hearts onto Copic friendly cardstock, I cut out and framed with a die from the Slim Line Stitched and Scalloped Rectangles and Alpha Die Cutting System. Yes, that is a long name but there is a lot included in the die set. Next I stamped the sweet elephants from the previously released The Best Hugs Ever set onto Copic friendly cardstock and cut out with the matching die. I stamped the sentiment onto a cherry kisses cardstock strip using Versamark heat and white heat embossed. A trio of sequins from the Poker Face Sequin Mix Plus provided a bit of sweet sparkle. 

Products: Picket Fence Studios stamps and dies, PTI and The Stamp Market cs, PFS sequins, Altenew and Versamark ink, Copic Markers

I hope your new year is off to a great start! 

photo signaturecopy_zpsn7wywovz.png

Sunday, January 1, 2023

Yoda the Best

Happy New Year crafty friends! 


I am sharing the card I made for my Star Wars loving son for his birthday in December. I used an older stamp set by a now defunct stamp company, Craftin' Desert Divas. I stamped the yoda, wookie and ewok from the Troll Wars set onto Copic friendly cardstock, colored with Copic Markers and then fussy cut out. For the background I masked off a portion of the card front, then blended on blueberry and black soot ink onto the space. I applied Picket Fence Studios Winter Snowfall Paper Glaze Velvet over the Miss Ink Starry Night Stencil for a starry night sky. I removed the stencil and allowed the glaze to dry, then stamped the sentiment using rich cocoa ink directly onto the panel. The images were attached with foam dimensionals. 

Products: Craftin's Desert Divas stamps, PTI cs, PFS Paper Glaze, Miss Ink stencil, MFT, Ranger Distress and Memento ink, Copic Markers
Copics: Yoda-G0000, G000, G00, R00, R01, C00, C1, C3, E41, E42; Wookie-E30, E31, E33, R01, R20, R24, T0, T1, T3; Ewok-W00, E81, R01, T0, T1, T3

Let's all pray that 2023 is a better year for all. 


photo signaturecopy_zpsn7wywovz.png