Showing posts with label Picket Fence Studios. Show all posts

Wednesday, January 25, 2023

Tankful for You {Picket Fence Studios}

Good morning crafty friends. This is my last post for Picket Fence Studios as of the end of this month I will have finished my design team term. Of course I will continue to use their fabulous products as I have many favorites from their stamp/die/stencil/paper glaze lineup. 

First I did some two step stamping on three of the fish from the new O-fish-ally stamp set from the January release using cheeky/pucker, seafoam/ocean and celery/pearfection inks. All were cut with with the matching dies. I also cut pieces from the ireviously released Layering Flora: Leaves and Twigs die set from various colors of cardstock to represent ocean floor seaweed and other flora. For the background I masked off the upper portion and used a brush from the from the Life Changing Blender Brushes to blend on antique linen distress ink to represent the ocean floor or the bottom of a fish tank. I then partially stamped the new Scene Building:Sand using kraft ink. After masking again, I blended on seafoam ink to represent water and stamped the Sand image using surf ink. I assembled the scene then attached the sentiment from the O-fish-ally set which was stamped using surf ink and cut out with the matching die.  

Products: Picket Fence Studios stamps and dies, PTI cs, Simon Says and Ranger Distress ink

I hope you like this simple but colorful underwater scene. 

photo signaturecopy_zpsn7wywovz.png

Thursday, January 19, 2023

Soar Butterfly {Picket Fence Studios}

Today's card is another one using products from the January Picket Fence Studios release.


I folded a piece wisteria cardstock, then used the new Soar Butterfly Die mat die to create a butterfly shaped card. I then used the butterfly cut out to cut twice from light pink textured cardstock and also one layer of acetate from the ShakerSheets package using the mat die again. The two pink die cuts were glued together and then backed with the acetate piece. I created a "faux" shaker by adding spots of glue to the card base and randomly placing sequins from the new Butterfly Bush Sequin Mix. The sentiment came from the Done Adulting for the Day and was stamped using Wisteria ink and cut out with the matching die

Products: Picket Fence Studios stamps, dies and sequins, MFT and Bazzill cs, Simons Says ink


Later friends. Have a blessed day!

photo signaturecopy_zpsn7wywovz.png

Tuesday, January 17, 2023

Flit Butterfly {Picket Fence Studios}

Good morning. I have another card using the January Picket Fence Studios release.


This release has some amazing stencil and die combos which produce the most beautiful butterflies. I used the Layered Flit Butterfly Stencil to blend spiced marmalade and dried marigold for the main butterfly body using brushes from the Life Changing Blender BrushesI then used the second layer of the stencil to blend black ink onto the wings. I cut out with the matching Flit Butterfly die as well as a few tiny butterflies from the same set. I partially blended on the new Raw Kale Paper Glaze using the previously released Slim Line Trapezoid Spiral Stencil onto a stitched edge spring rain cardstock The sentiment came from the More Fancy Sentiments set and was cut out with the matching die, attached to the card panel using foam dimensionals as was the butterfly. To finish it up I added a trio of the tiny butterflies around the sentiment.

Products: Picket Fence Studios stamp, dies and stencil, PTI cs, PFS Paper Glaze, PFS ink

Don't you just love butterflies?

photo signaturecopy_zpsn7wywovz.png


Saturday, January 14, 2023

Picket Fence Studios January 2023 Release


It is release day at Picket Fence Studios and we have some really fun products that are available for purchase now.

We are celebrating the release with an Instahop on Instagram. If you want to participate in the Instahop start @picketfencestudios. There is a fabulous prize in play so be sure to check it out. You have until Tuesday, January 17, 2023 at 11:59 CDT to participate. One winner will be randomly selected and announced on Wednesday, January 18th, 2023 on the @picketfencestudios Instagram Account.


I used the new Ocean View insert die to cut the opening from a white linen stitched edge rectangle and also used it for partial cuts from spring rain and bright buttercup cardstock to fill in the openings and then added some easy Copic coloring to the sun rays. The two small dolphins from the new Even More of a Fishy Lot were stamped onto Copic friendly cardstock, cut out with the matching dies and colored with Copic Markers. The sentiment was stamped onto spring rain cardstock and also cut out with the coordinating die. The images and sentiment were attached to the card front with a layer of craft foam. A few sequins from the new Sea of Dolphins Sequin Mix finished up this clean and simple card.

Products: Picket Fence Studios stamps and dies, PTI cs, PFS sequins, Copic Markers


For this card, I specifically had in mind my step granddaughter who recently entered the transfer portal and subsequently received a full ride academic and athletic (soccer) scholarship to Loyola University in Baltimore. The school colors are gray and dark green and although you can't tell from the photo the card base is soft stone. I stamped the new The Finish Line using the Black Hybrid Ink Pad on the card front of a side folding landscape card base, then trimmed off the edge to follow the diagonal finish line. I cut a 1x4.25 strip from dark green cardstock and stamped the small image using Versamark ink and white heat embossed and adhered onto the inside edge. I then stamped the sentiment from the also new Tact vs Sarcasm sentiment set using Versamark ink onto the same dark green cardstock, white heat embossed and attached with a foam dimensionals. 

Products: Picket Fence Studios stamps and dies, PTI and The Stamp Market cs, PFS and Versamark ink

Thank you for stopping by my little corner. Now go to @picketfencestudios to start the Instahop.

photo signaturecopy_zpsn7wywovz.png

Wednesday, January 4, 2023

A Hug from Me to You {Picket Fence Studios}

Good morning. I am transitioning out of Christmas card mode to the next big holiday of Valentine's Day with today's card.


After stamping the new Picket Fence Studios Flow of Hearts onto Copic friendly cardstock, I cut out and framed with a die from the Slim Line Stitched and Scalloped Rectangles and Alpha Die Cutting System. Yes, that is a long name but there is a lot included in the die set. Next I stamped the sweet elephants from the previously released The Best Hugs Ever set onto Copic friendly cardstock and cut out with the matching die. I stamped the sentiment onto a cherry kisses cardstock strip using Versamark heat and white heat embossed. A trio of sequins from the Poker Face Sequin Mix Plus provided a bit of sweet sparkle. 

Products: Picket Fence Studios stamps and dies, PTI and The Stamp Market cs, PFS sequins, Altenew and Versamark ink, Copic Markers

I hope your new year is off to a great start! 

photo signaturecopy_zpsn7wywovz.png

Wednesday, December 28, 2022

Thinking of You {Picket Fence Studios}

Good morning all. I hope you had a blessed Christmas holiday. 


Considering this terrible winter weather we've had across the county even here in the south, I am thinking in terms of "hurry up spring" with today's card. I first used blended spun sugar ink over the new A Whole Lot of Polka Dots 6x8 Stencil for my background. I then stamped the largest floral from the previously Carnation Flower Garden, cut out with matching die and colored it with Copic markers. I also stamped the sentiment from the More Fancy Sentiments using new leaf ink and cut out with the coordinating die. I used both dies to cut out a foam layer in order to attach to the card front for added dimension. A scattering of sequins from the also new All About the Pinks Sequin Mix provided a bit of sparkle. 

Products: Picket Fence Studios stamps, dies and stencil, PTI cs, PFS Sequins, PTI, Ranger Distress and Memento ink, Copic markers
Copics: Florals-RV00, RV52, RV55, G12, G14, G07

We here in the south are finally getting a break from the extremely cold weather. We are not prepared for it like other parts of the country. My prayers go out out to all those suffering. 

photo signaturecopy_zpsn7wywovz.png

Wednesday, December 14, 2022

Picket Fence Studios December 2022 Release


It is release day at Picket Fence Studios and we have some really fun products that are available for purchase now.

We are celebrating the release with an Instahop on Instagram. If you want to participate in the Instahop start @picketfencestudios. There is a fabulous prize in play so be sure to check it out. You have until Saturday, December 18, 2022  at 11:59 CDT to participate. One winner will be randomly selected and announced on Sunday, December 18th, 2022, on the th@picketfencestudios Instagram Account.


As much as I love to make Christmas cards, it was fun to take a break from the Christmas colors. The minute I saw the new My World Revolves Around You stamp in my design team box I knew that I wanted to create a sunshine filled card. I stamped it directly onto the card frot using bright buttercup ink, then stamped again with Versamark ink and clear heat embossed. I then stamped the previously released A Sunflower onto Copic friendly cardstock using espresso truffle ink, cut out with the matching die then colored with Copic markers. I trimmed the image for an off the panel look and attached with a craft foam. The sentiment was stamped onto a green parakeet cardstock strip using Versamark ink and white heat embossed. A scattering of the new All About the Yellows Sequin Mix added more sparkle and sunshine.

Products: Picket Fence Studios stamps and die, PTI cs, PFS Sequins, Memento, PTI and Versamark ink, Copic Markers


My second card is another simple one even though I used a lot of new products. I created the background first by using the new A2 Pierced Blanket Cover Plate to cut from white linen cardstock. I stamped the new Oh, Baby Baby using grapefruit ink onto sweet blush cardstock, then cut out with a circle die. The frame was cut from stardust cardstock with a die from the new Nesting Rings Dies set. I offset on the panel and trimmed to fit.  I used the new A Little Note Word Die to cut from white linen and sorbet cardstock for a inlaid look and attached with a layer of craft foam. Lastly I used several dies from the new Layering Flora: Leaves and Twigs to cut from forest and white linen cardstock, slipping underneath the diecut sentiment. 

Products: Picket Fence Studios dies, PTI, Concord & 9th and The Stamp Market cs, Concord & 9th ink

I will share more projects from this release throughout the month. Now go to @picketfencestudios to start the Instahop.

photo signaturecopy_zpsn7wywovz.png

Sunday, December 11, 2022

Holly Jolly Christmas {Picket Fence Studios}

As part of Picket Fence Studios Christmas Countdown, I have a holly filled card to share today.


After stamping the oversized image from the Holly Jolly Christmas set onto Copic friendly cardstock, I cut out with the matching die and colored with Copic markers. For the background panel, I repeated the image by stamping onto a cherry kisses stitched edge cardstock piece using Versamark ink along with the sentiment and white heat embossed both. The stamped die cut was attached to the panel using a combo of glue and foam dimensionals. A few sequins from the Dancing Reindeer set added a bit of tone on tone sparkle. 

Products: Picket Fence Studios stamp and die, PTI and The Stamp Market cs, PFS Sequins, Altenew and Versamark ink, Copic Markers
Copics: R32, R35, R37, G21, G24, G28


Thank you for stopping by. I hope the week brings you many blessings.

photo signaturecopy_zpsn7wywovz.png

Thursday, October 27, 2022

Joy {Picket Fence Studios}

I have one more card using products from the October Picket Fence Studios release. 

I used the Joy Word Die to cut from gold metallic card and then again from craft foam, then layered the two pieces together. I also stamped one of the angels from the Angels Sing to the Newborn King cutting out with the matching die and colored with Copic markers. I trimmed off the bottom portion of the image, then inserted in the opening of the "o". I placed the piece onto a linen cardstock background with a black pearlescent cardstock strip. A few sequins from the Black Tie Affair Sequin Mix finished up the clean and simple card. 

Products: Picket Fence Studios stamps and dies, PTI cs, Michael's metallic cs, PFS Sequin Mix, Altnew ink, Copic Markers

This was a big release of both Christmas and winter themed products. Normally I do more projects but I simply run out of time before my retina surgery. Not to mention I had a lot of anxiety about the surgery and found it hard to concentrate. 

photo signaturecopy_zpsn7wywovz.png

Tuesday, October 25, 2022

Rockin' Around the Christmas Tree {Picket Fence Studios}

Today's card was created using products from the October Picket Fence Studios release. 


I stamped the three mice and the tree from the Rockin' Around the Christmas Tree set, cut out with the matching dies and colored with Copic markers. I also stamped the sentiment onto red cardstock using Versamark and white heat embossed. For the background, I partially blended blueberry sky ink with a Life Changing Blender Brush over the Slim Line Falling Snowflakes Stencil. The images and the sentiment were attached to the card front using foam dimensionals. 

Products: Picket Fence Studios stamps, dies and stencil, PTI cs, Altenew, PTI and Versamark ink, Copic Markers

Normally I list the Copics I use but accidently erased my list and couldn't recover it. 

photo signaturecopy_zpsn7wywovz.png

Friday, October 21, 2022

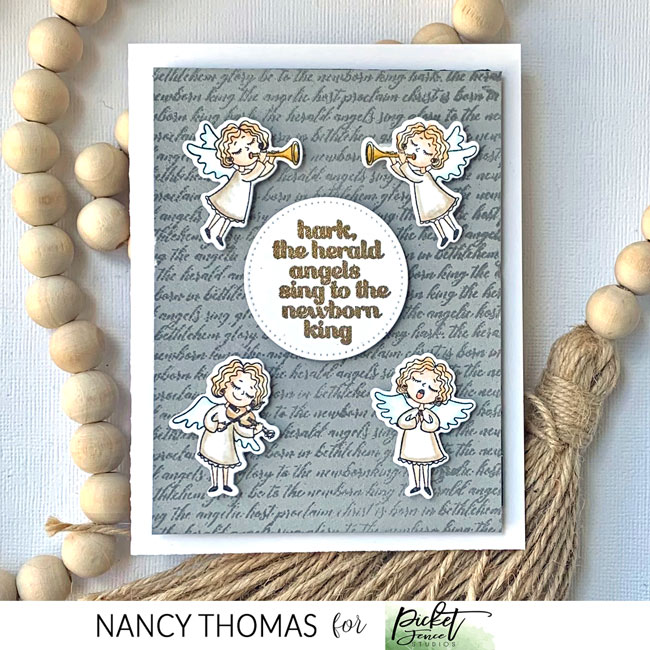
Angels Sing to the Newborn King {Picket Fence Studios}

Good morning. I have another card created using the October Picket Fence Studios Release. 


I stamped four of the angels from the Angels Sing to the Newborn King set onto Copic friendly cardstock, cut with the matching dies and colored with Copic markers. The sentiment was stamped with Versamark and gold heat embossed and cut out with a circle die. For the background I stamped Hark,the Angels Sing onto gray cardstock using Versamark ink, then clear heat embossed. After trimming the background piece, the sentiment and images were attached with foam dimensionals. Then the whole panel was attached to the card base with Foam Tape

Products: Picket Fence Studios stamps and dies, Simon Says and PTI cs, Versamark and Altenew ink, Copic Markers
Copics: Skin-E000,E00, R02; Hair-E50, E53; Dresses-E40, E41; Wings-BG0000, BG000; Instruments-YG21, YG26, E30, E31


I've been laying low the past several days as I had retina surgery on the 13th. I have a real ugly red eye but the eyesight is getting better every day. 

photo signaturecopy_zpsn7wywovz.png

Friday, October 14, 2022

October 2022 Picket Fence Studios Release


Hello crafty friends. It is release day at Picket Fence Studios and it's all about Christmas and Winter. 

We are celebrating the release with an Instahop on Instagram. If you want to participate in the Instahop start @picketfencestudios. There is a great prize in play so be sure to check it out. You have until Tuesday, October 18, 2022  at 11:59 CDT to participate. One winner will be randomly selected and announced on Wednesday, October 19th, 2022, on the @picketfencestudios Instagram Account.


I used the new Santa's Hot Cocoa Mug to create this no fold mug card. I cut the solid piece twice from hibiscus burst ink, then the cutout piece from white. I used the white cut out piece to as a pattern and lightly penciled the area on the two solid pieces for the cup handle opening and cut both pieces with a Fiskars fingertip craft knife. I then spot cut out from hibiscus burst and red poppy ink and the cutouts from green mini checked patterned paper and assembled all the pieces onto the mug shaped mat. I then stamped the various elements from the Build Me a Gingerbread House and cut with the matching dies and colored with Copic markers. I also cut out the small snowflakes from the mug set and the larger snowflake from the new Jolly Good Rainbow die. All the pieces were cut again from plain white cardstock and glued together to hide the ink on the back but also to reinforce them. A candy cane and larger snowflake was added to the the front of the second piece then another candy cane and berry stem to the back o the top piece. Another berry stem, two small holly leaves and a larger holly leaf and pink and white twine were added the coffee cup handle. I used layers of craft foam and Foam Tape to layer the two cup pieces together and get the separation I wanted. I stamped another berry cluster to a white cardstock piece, colored with Copic markers, then attached to the back of the piece. 

Products: Picket Fence Studios stamps and dies, Doodlebug dp, PTI cs, The Twinery twine, PFS Foam Tape, Altenew ink, Copic Markers
Copics: Candy Canes-R20, R21, R24, R27; Holly Leaves-YG01, YG03, YG25; Berries-R81, R83, R85, R46


I cut the main die from the Jolly Good Rainbow die first from a white linen cardstock card front which gave me the cutout and some of the arches. I then used the die to cut from hawaiian shores, cherry kisses and green parakeet cardstock which gave me quite a few more arches. After backing the cutout with white cardstock, I arranged the colorful arches, playing around with them, then glued them down when I was happy with the arrangement. Using the die included in the set, I cut out two sets of snowflakes which I matted together and attached to the rainbow. The sentiment from the Rockin' Around the Christmas Tree set was stamped with cherry kisses ink, cut out with the matching die and attached to the card front using foam dimensionals. As you can see here I did not use the mat portion of the die which is needed if you wanted to make a rainbow shaped card. 

Products: Picket Fence Studios stamp and dies, PTI and The Stamp Market cs, The Stamp Market ink

I will share more projects from this release throughout the month. Now go to @picketfencestudios to start the Instahop.


photo signaturecopy_zpsn7wywovz.png

Wednesday, October 12, 2022

Joyeux Noel {Picket Fence Studios}

I love florals for Christmas cards. This card uses products from the Picket Fence Studios September release.


I stamped the largest image from the Seasonal Christmas Flowers set onto Copic friendly cardstock, cut out with the matching die and colored with Copic markers. I used a small spatula to partially apply Winter Snowfall Paper Glaze over the Winter Rings 6x6 Stencil onto the card front piece for tone on tone texture. I added a gold metallic cardstock border strip, then stamped the sentiment from the Swanky Christmas Sentiments set using golden glitz ink. I used the More Ash Leaves dies to cut from gold metallic cardstock, then attached the flower and the leaves to the panel. I added texture to the flower center using the Winter Snowfall Paper Velvet then pounced on Golden Sparkle Paper Glitz once dried. A few sequins from the Classic Christmas Sequins set finished it up. 

Products: Picket Fence Studios Stamps, dies and stencil, PTI and Michaels cs, PFS Paper Glaze and Paper Glitz, Altenew and Delicata ink, Copic Markers
Copics: G20, G40, G43

Christmas is closer than we think!

photo signaturecopy_zpsn7wywovz.png

Saturday, October 8, 2022

Picket Fence Studios and Maker Forte Collaboration


The Picket Fence Studios (@picketfencestudios) Design Team members are collaborating with Maker Forte (@maker.forte) designers today with an Instahop.  If you want to participate in the Instahop start @maker.forte. There are prizes available so be sure to check it out. Winners will be announced October 17.


Using the
Life Changing Blender Brushes I blended on Maker Forte Palm Tree, Tiptree Jam and Blue Raspberry ink onto white cardstock, then trimmed it down. I created myown stencil by using various circles to create cutouts from a piece of acetate then blended the Snow Flurries Pigment ink in the various circles for a Bokeh look. I stamped the pair of polar bears from the A Polar Bear Christmas onto Copic friendly cardstock, cut out with the matching die and colored with Copic markers. I stamped the sentiment from the Winter Has Come to Town set onto black cardstock using Versamark ink and white heat embossed. After trimming the sentiment piece, I added the moon and stars on the back which were cut out using the Santa's Sleigh Ride Snow Globe die. Both the image and sentiment were attached to the top folding card base using foam dimensionals. 

Products: Picket Fence Studios stamps and dies, PTI cs, Altenew, Versamark and Maker Forte ink, Copic Markers
Copics: Bears-W00, E81; Scarves-B000, B01, BG02, RV52, RV55, RV17


Thank you for stopping by today and don't forget to hop on over to Instagram for a chance to win a prize and to see all the beautiful projects that have been created for this collaboration.

photo signaturecopy_zpsn7wywovz.png

Monday, October 3, 2022

Tricks and Treats

Good morning. I am taking a break from Christmas cards with a Halloween card today using products from Picket Fence Studios

I created the card front by adding a patterned paper border at the top portion and then cutting out circle with a inside/out stitched die and attaching the cellophane in the opening. I then stamped several of the small Halloween icons to the bottom along with the sentiment all from the Here for All the Boos stamp set. To create the shaker sandwich I stamped the card base with one of the ghosts also from the Here for All the Boos four times onto the card front for the backing. I filled the shaker spot with a combo of pieces from the Spooky Town Sequin Mix plus some purple pieces from another sequin mix that is no longer in stock. I added Foam Tape to the back, then placed on the card front incapsulating the shaker mix. Lastly, I cut out one of the ghosts from the Three Ghastly Friends from white textured cardstock, then added to the card front using foam dimensionals. 

Products: Picket Fence Studios stamps and dies, Doodlebug dp, PTI cs, PFS Sequins, Altenew and Simon Says ink, Copic Markers
Copics: YR01, YR02, YR04, YG01, YG03

I am submitting this to the Color Hues #50 Challenge of Orange and Purple. 


I hope you have a great week. Thank you for stopping by. 

photo signaturecopy_zpsn7wywovz.png

Monday, September 26, 2022

A Day for Snowflakes {Picket Fence Studios}

Today's cards feature the big snowflakes dies from Picket Fence Studios

I started out by using the Snowflake Frost Die to cut from vellum for the mat portion and linen cardstock for the actual snowflake. I painted on some Sparkle Paper Glitz for a hint of shine on the snowflake. While the snowflake dried, I blended Rudolph's Nose Velvet Glaze over the Christmas Ornaments 6x6 Stencil using a Mixed Media Spatula onto white cardstock, eliminating the ornament top and bow portion. After the piece dried, I cut it out with a circle die. I stamped the smallest holly and berry leaves from the Seasonal Christmas Flowers twice onto Copic friendly cardstock, cut out with the matching die and colored with Copic markers, attaching to the top of the ornament.I also painted on Mistletoe Velvet Glaze onto the edge of a piece of cardstock, and then cut off two small strips for borders when dried. The sentiment from the Swanky Christmas Sentiments was stamped directly onto the card front using gala red ink. After attaching the matted snowflake, I added the ornament circle using a layer of craft foam and the border strips for contrast. 

Products: Picket Fence Studios stamps, dies and stencil, PTI cs, Paper Source Vellum, PFS Velvet Glaze, Altenew and WPlus9 ink, Copic Markers
Copics: Leaves-G12, G14, G17; Berries-R11, R14, R17


I nested both of the dies from 
Snowflake Crystal Die set to cut from both white linen and spring rain cardstock so that I cut have a "frame" around the snowflake. This resulted in a card front cutout as well and I assembled all of the pieces together and glued onto an acetate sheet. I added various Foam Tape on the back in order to capture the shaker pieces from the Plum Pudding Sequin MixWinter Snowfall Paper Velvet blended over the Winter Rings 6x6 Stencil in three of the corners added some texture. I added a few more of the sequins in the bottom left corner before the paper velvet dried. The sentiment from the There's a Feeling of Christmas was stamped onto a wild wisteria cardstock piece with silver metallic cording added for more sparkle. 

Products: Picket Fence Studios stamp, dies and stencil, MFT and PTI cs, PFS Sequin Mix and Paper Velvet, Paper Source cording, Altenew ink

I hope you've enjoyed this snow day!

photo signaturecopy_zpsn7wywovz.png

Wednesday, September 21, 2022

Mr. Frost Comes to Town Card Kit {Picket Fence Studios}

The limited edition Mr. Frosty Comes to Town Kit is available to purchase now! Nicole will be showcasing the kit tonight in the Picket Fence Studios Facebook Community at 6pm CDT so be sure to check it out. 

I had so much fun creating projects from this kit which is filled with Christmas and winter goodness. This is the second kit from Picket Fence Studios and I know you are going to love it as much as I do. Everything I mention in bold is included in the kit. So let's get started!


First up is a slim line card. I stamped the snowman from the Snowone Else Like You stamp set onto Copic friendly cardstock, cut out with the matching die and colored with Copic markers. I used a die from the Slim Line Nested Rectangle Die Set to cut the Blue and Black Pearlescent Cardstock for the background then attached the image using a layer of craft foam. I painted on some Nordic Lights Paper Glaze Velvet onto plain white cardstock, then after the glaze dried, I cut out several snowflakes using the More Winter Snowflake Dies and applied a couple of layers of Sparkle Paper Glitz. The partial sentiment from the stamp set was stamped onto a strip of the White Pearlescent Cardstock using something borrowed ink. I cut a strip from the Cerulean Blue Cork Fabric, added a bit of Nordic Lights Paper Glaze Velvet on the ends, then cut some "fringe" using the piece as an additional scarf. It was attached and anchored with one of the snowflakes cut earlier. Another snowflake and a few the Snowflake Sequin/Clay Mix pieces provided the finishing touch. 

Copics: Snowman-W00, E81, R00, R01, R05, B21, YR01, YR04, B23, B26, R01, R05; Hat-C00, C1, C3, C5, B21, B23, B26; Holly/Berries-R11, R14, G12, G14; Ear Muffs-B21, B23, B26, G0000, G000, G00, G12; Scarf-B21, B23, B26


For my second card, I painted on the Sparkle Paper Glitz onto plain white cardstock. Once dried, I cut out all five snowflakes from the More Winter Snowflake Dies then attached to the Blue Pearlescent Cardstock background panel. Aren't they pretty? The sentiment from the Snowone Else Like You stamp set was stamped using dove gray ink onto a strip cut from the White Pearlescent Cardstock, then attached with foam dimensionals.   


For the third card I attached one of the Silver Snowflake Diecuts offset on the White Pearlescent Cardstock background panel. For the two layered snowflakes I used the largest die from the More Winter Snowflake Dies. To achieve the look I wanted I painted on the Nordic Lights Paper Glaze Velvet onto plain white cardstock, then cut out when dried and applied a couple of layers of Sparkle Paper Glitz. I then custom mixed the Nordic Lights and Sparkle Glitz and painted onto the plain white snowflake. The sentiment from the Snowone Else Like You stamp set was stamped directly onto the panel using dove gray ink A smattering of the Snowflake Sequin/Clay Mix pieces added even more sparkle. 


My extremely talented fellow design team members will have so much more to show you using this beautiful kit. 

photo signaturecopy_zpsn7wywovz.png