Showing posts with label Silhouette. Show all posts

Monday, July 26, 2021

{The Cat's Pajamas} Christmas Gift Tags

Today's projects are all about some of the new The Cat's Pajamas cutables. Alma knows how much I love tags and I was delighted to see the super cute Christmas tags she created for us to play with including this adorable set. I foresee me cutting all of these. And of course you can cut them at any size you want, so they can also go on cards if you don't need gift tags.


I selected two .svg files from the Wonky Ornament Tag Cutables to work with in my Silhouette machine. I love the color combos Alma used on the graphics and I was tempted to use the same. However, I thought that might be a bit redundant. Everything was cut from either cardstock or patterned paper. 


I added some small jewels for sparkle.


And either ribbon, cording and gold thread to the ornament holes. 

Products: The Cat's Pajamas cutables, Doodlebug dp, Bazzill cardstock, Hemptique cord, May Arts ribbon, Doodlebug jewels

I had a blast making these and I am sure you will too.  


You only have until the end of this month to take advantage of the 60% off sale on our physical inventory. As always, thanks so much for stopping by. 

photo signaturecopy_zpsn7wywovz.png

Saturday, November 21, 2020

{The Cat's Pajamas Sneak Peek} Theater Cutable

Welcome to another day of The Cat's Pajamas November Sneak PeeksThere are 5 new stamp sets in which 3 have matching die sets and one new Cutables in this release. The three stamp and matching die sets are available to purchase separately or as a bundle with special pricing.


And as an added bonus the annual Black Friday coincides with the new release. The 40% discount runs through December 1 and includes the newest products.


Today we are highlighting the new Theater Cutable.


I used the new Yeti to Party bundle to stamp and cut two of the images and colored with Copic markers. Using my Silhouette, I cut the theater card pieces from white, turquoise, red and yellow cardstock for an A2 size card. The side mats were cut using a pierced die. The red labels on each side were cut using a die from the Fancy Flips set and I used the small heart die from the Yeti to Party die set.  I also used the Comic Balloons die set to add some interest around the cute little yeti. The sentiment was stamped directly onto the front frame of the card and I used the County Fair die to create the banner across the front of the card.


Products: The Cat's Pajamas stamps and dies, Doodlebug and Honey Bee dp, PTI cs, Altenew ink, Copic markers
Copics: Yeti-BG000, BG01, BG02, Y11, Y13, Y17; Balloons-R20, R22, R24, R27, BG000, BG01, BG02, Y11, Y13, Y15


For a chance to win a $10 gift certificate to the store, comment on each of the designer's blogs including mine today and also on my Instagram account @nancyhthomas. Check the The Cat's Pajamas Blog to see which designers are participating that day. Winners will be announced on The Cat's Pajamas Blog and Facebook page each day.


Here are all the new products:


I will be back tomorrow with another TCP project. Thank you for stopping by!

photo signaturecopy_zpsn7wywovz.png

Wednesday, June 17, 2015

Being Unique {Color Throwdown #347}


I'm back with another project as June Guest Designer for the Color Throwdown Challenge. This week's challenge colors are turquoise, hot pink, gray and white.


I first cut the background piece with my Silhouette using the Funky Chevrons file. The flamingo body and wing from the Reverse Confetti Fabulous Flamingo set was stamped with Rose Bud ink and then cut out with the matching Fabulous Flamingo dies. The eye/beak and the legs were stamped with black ink and the legs were fussy cut out. The sentiment was stamped onto a circle cut with a die from the Circles 'n Scallops set. The flowers from the Petals 'n Posies set were stamped with  the same Rose Bud ink and then cut out with the matching Petals 'n Posies dies as was the stems cut from cardstock After attaching the various pieces to the card base using foam tape, I added a scattering of enamel dots. I am double dipping on challenges this week by using the current Sketch For You to Try (#25) for the layout.

Products: Reverse Confetti stamps and dies, PTI, Stampin' Up, MFT and DCWV cs, My Mind's Eye enamel dots, Memento and Simon Says inks

Before you head off to create a project with these fun colors, here’s some inspiration from the talented Color Throwdown team to get you started. 

Barbara Anders -  Paper Pursuits
Broni Holcombe -  Splashes of Watercolor
Joan Ervin -  Stamping With Passion
Lori Tecler -   Inking Aloud
 Wanda Cullen -  Cullen-ary Creations
Monika Davis-  MAD Stamper
Jodi Collins -  Stamping a Latte
Tammy Hershberger -  Stamp Happy

Once you’ve finished your card or other paper crafting project using the colors, add a direct link to your creation using the linky tool at the bottom of the CT blog post. And, don’t forget to use the keyword CTD345 if you upload your project to an online gallery, or hashtag on social media with #ctd345 and/or #colorthrowdown


Sunday, May 24, 2015

{The Cat's Pajamas Sneak Peeks} Spotlight on Cutables


It's the last day of The Cat's Pajamas sneak peeks. The Pajama Party is tonight and right after that the party the new stamps, dies and cutables will be available for purchase.


Today we are spotlighting the two new Cutables for this release. This includes the Shadow Box Cutables as well as the new Tri-Shutter Card Cutables.


I used the the Shadow Box Cutables with my Silhouette, cuting the back from white cardstock and the front from Spring Rain cardstock, I cut out the image panel using one of the dies from the Framed Up 2 Cutups which is also a bit larger than the opening of the card front. After stamping the image from the new Constellation Prize set I colored with Copics. I added clouds and stars cut with a combination of the new Stitched Clouds CutUps (which is the free set with a $65 purchase), the clouds from the Stitched Fly CutUps and the 3x3 Stars CutUps, attaching them to the panel with foam tape. I added a few buttons in various places and then secured the panel to the back with card base with craft foam. I cut out the largest cloud in the Stitched Clouds CutUps from white cardstock and patterned paper and stamped the sentiment onto the white one. After attaching to the card base front I added a couple of more stars.


I also included a couple of clouds, a star and another sentiment on the back card base and then attached the front and back card bases together using double sided tape.

Products: The Cat's Pajamas stamps, CutUps and Cutables, PTI cs, My Mind's Eye buttons, Simon Says ink, Copic Markers
Copics: Moon-YR30, YR31; Penguins-C00, C1, Y21; Shadows-BG70, BG0000, BG000


Here are some details you need to know:

1. All the new stamps and dies will be released on Tuesday,  May 26.


2. If you're IN IT TO WIN IT, visit the TCP Facebook Page to comment and chat on the IN IT TO WIN IT post every day for an opportunity to score some new TCP goodies. Here are the other Cat Pack participants:  TammyLoriDeborah

3. The Pajama Party is tonight, Monday, May 25 from 8-10pm EDT.


Here are the new products I used today:


My Sale Page.


Friday, March 13, 2015

{The Cat's Pajamas Sneak Peek} Spotlight on Cutables


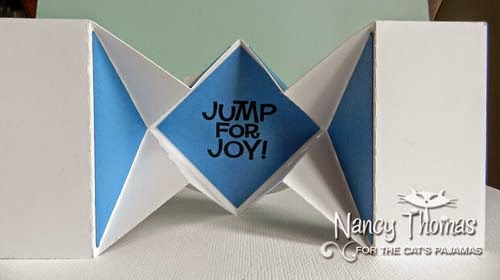
It's Day 5 of The Cat's Pajamas sneak peeks and today we are spotlighting the two new Cutables for this release. This includes the Diamond Fold and Half Diamond Fold Card Cutables as well as the new Cascade Card Cutables.


I cut out the Diamond Fold card base file from white cardstock using my Silhouette. I had to resize due to the fact that I have a Portrait (8.5x11 size) so my card is smaller. When completely folded up it reminded me of a mortarboard shape so I thought it would be perfect for a graduation card. I cut the mats twice from Blueberry Sky and Scarlet Jewel cardstock which represent the school colors of the graduate who will be receiving this. I used the triangular shapes mosaic style on the various folds of the card and also on the side fronts. To decorate the front of the card, I also used the matching image Cutables Alma provides with each release to cut out the penguin and one of the sentiments from the new Jump for Joy set. This set is free with a $65 purchase. After stamping onto the cut shapes, I colored the penguin with Copic Markers and then attached to the card with dimensional dots and added the cut sentiment onto one of the side fronts. Another sentiment was stamped onto the smallest piece from the Circus Panel CutUps, placing just underneath the penguin with a couple of buttons. I added another hidden sentiment at the back of the card along with a two extra triangle mats. I plan on folding up money here for the gift.


This is how it looks when it is folded up.


This is the back view with the sentiment. There is plenty of room on the sides to write a note and sign it. 


Another view from above. 

Products: The Cat's Pajamas Stamps, CutUps and Cutables, PTI cs and buttons, Teresa Collins enamel dots, Copic Markers
Copics: C00, C1, YR30, YR31, W00, E81


Here are some details you need to know:

1. All the new stamps and dies will be released on Tuesday,  March 17.


2. If you're IN IT TO WIN IT, visit the TCP Forum at Splitcoaststampers to comment and chat on the IN IT TO WIN IT thread every day for an opportunity to score some new TCP goodies.


3. Save the date for the Pajama Party on Monday, March 16 from 8-10pm EDT.


Here are the other Cat Pack participants:  ChristineTammyLori,

These are the new products I used today:


My Sale Page.

Thursday, October 9, 2014

Halloween Gift Set

If you were around when we were posting The Cat's Pajamas Sneak Peeks you saw this gift set I created for my granddaughters. Today I have another another Halloween Cookie Baking set for yet another set of granddaughters. I actually shared this at the The Cat's Pajamas pre-release Pajama Party at Splitcoaststampers but not here on the blog.


First up, I made a belly band for the cookie cutters (from Sur la Table) using a combination of Spellbinders Nestabilties (black and white) , the largest frame from the FancyFlip Frames (bright orange) and the Star Rosette CutUps (green) to cut the centerpiece which I attached together with an oversized brad from my stash.


I used the matching Cutables Brains! set in my Silhouette to cut out the mummy. After stamping the image onto the cut out I colored with Copic Markers. I combined this fun image with the new Pop-Up Treat Holder Cutables that I cut with a Silhouette. I resized to fit my Portrait Silhouette but also made a couple of more changes since I wanted to use mine for a Halloween themed mini spatula rather than candy.  I added an extra cut to the bottom of the treat card so I could insert the spatula through it. I had to forgo the "pop up" part due to the fact that I couldn't get any type of adhesive to stick to the mini spatula so it's more of a paintbrush style cover. I stamped the matching sentiment onto a piece cut with the smallest die from the Circus Panel CutUps and attached it inside the treat card. I also added "slime" which I cut with the Slime/Icicles CutUps and then adhered the mummy to the front. Lastly I tied a bow around the spatula handle.


For the icing tubes, I made a bag topper using a combination of dies from the Framed Up 2 CutUps, Fancy Flip and FancyFlip Frames, stamping the sentiment from the Eat, Drink and Be Scary set.


Products: The Cat's Pajamas stamps, CutUps and Cutables, Ki Memories dp, Bazzill cs, Doodlebug ribbon, Copic Markers
Copics: Skin-E0000, E000, E11; Mummy-W00, E81

Have a great day. Thanks so much for stopping by!

My Sale Page.

Tuesday, September 23, 2014

{The Cat's Pajamas Sneak Peek} Eat, Drink and Be Scary


Welcome to Day 2 of The Cat's Pajamas sneak peeks! We are moving on to a much less serious theme of Halloween. Halloween is one of my favorite holidays to make cards for so I am super excited to share today's project with you.

Today's card features the Eat, Drink and Be Scary set! I used the matching Cutables set in my Silhouette to cut out the Frankenstein, platter of skeletons and bones, the candelabra and table from Copics X-Press It cardstock. I stamped the images onto the various pieces and then colored with Copic Markers. I then got my Silhouette going again using the new Twisted Easel Cutables to cut out the card base, and mats from card stock and patterned paper. So easy! I layered the table pieces onto a panel cut with the matching pieces from the Fancy Flip and Fancy Flip Frames CutUps and attached it to the easel portion of the card. for the inside portion of the card, I stamped the sentiment onto pieces also from the Fancy Flip and Fancy Flip Frames CutUps with Studio Calico Purple Rain ink and then attached Frankenstein to it. I then layered a couple of purple Rox to the white mats to represent a couple of extra "eyes."


Products: The Cat's Pajamas stamps, CutUps and Cutables, Ki Memories dp, Queen and Co. Rox, Copic Markers
Copics: Skin-YG000, YG21, YG13; Hair-N1, N3, N5; Shirt-BG10, BG11, BG34; Pants/Candelabra- V12, V15, V17; Shoes/Tablecloth- C00, C1, C3, C5

Alma has a 'how to" video on creating the Twisted Easel card:


Here are some details you need to know:

1. All the new stamps and dies will be released on Tuesday, September 30.


2. If you're IN IT TO WIN IT, visit the TCP Forum at Splitcoaststampers to comment and chat on the IN IT TO WIN IT thread every day for an opportunity to score some new TCP goodies.


3. Save the date for the Pajama Party on Monday, September 29 from 8-10pm EDT.


Here are the other Cat Pack participants:  KelliWendy, Lisa, Lori, Alma  

And here are the new products I used today: