Friday, October 21, 2022

Angels Sing to the Newborn King {Picket Fence Studios}

Good morning. I have another card created using the October Picket Fence Studios Release. 


I stamped four of the angels from the Angels Sing to the Newborn King set onto Copic friendly cardstock, cut with the matching dies and colored with Copic markers. The sentiment was stamped with Versamark and gold heat embossed and cut out with a circle die. For the background I stamped Hark,the Angels Sing onto gray cardstock using Versamark ink, then clear heat embossed. After trimming the background piece, the sentiment and images were attached with foam dimensionals. Then the whole panel was attached to the card base with Foam Tape

Products: Picket Fence Studios stamps and dies, Simon Says and PTI cs, Versamark and Altenew ink, Copic Markers
Copics: Skin-E000,E00, R02; Hair-E50, E53; Dresses-E40, E41; Wings-BG0000, BG000; Instruments-YG21, YG26, E30, E31


I've been laying low the past several days as I had retina surgery on the 13th. I have a real ugly red eye but the eyesight is getting better every day. 

photo signaturecopy_zpsn7wywovz.png

Saturday, October 15, 2022

(The Cat's Pajamas} Halloween Gift Tags

Good morning. I have some fun Halloween projects to showcase today using digital stamps from The Cat's Pajamas.


For the witch tag, I combined the Witch from the Hide & Eek set and the Jack o' Lantern and Sentiment from the Hocus Pocus set using Silhouette software. For the second tag I combined Frankenstein from the Hocus Pocus set and the Moon Tombstone, Spider Web, Hanging Spider, Mound and Sentiment from the Hide & Eek set. The eraser tool was used to remove the moon from the tombstone and then I placed the sentiment on it. After I was satisfied with the arrangements, I printed onto Copic friendly cardstock and then cut out both images with a tag die. I used the matching frame tag die to cut from green parakeet and Hawaiian shores cardstock. Both tags were decorated with patterned paper, a button from my stash and the cardstock frames and then punched a hole in the top of each. Using the same tag set I used a larger die to cut a second patterned paper tag for each. I punched a hole on the two orange lunch bags I found in the card/gift wrap section of my local grocery store. 


For the witch tag set, I threaded black ribbon through the tags and the front of the bag and tied in a bow. 


The frankenstein set was attached with green grosgrain ribbon. 

Products: The Cat's Pajamas digital stamps, Altenew and Doodlebug dp, Memory Box dies, PTI ribbon, Copic Markers
Copics for Witch Tag: Skin-E000, E00; Hair-E40, E42, E44; Clothing-RV00, R81, R00, R11, R02; Broom-RV00, R81, Y13, Y21; Pumpkin-R00, R11, R02, Y13, Y21
Copics for Frankenstein Tag: Skin-G0000, G000; Hair-N1,N3, N5, N7; Clothing-B000, BG11, BG01, BV0000, BV000, BV01; Stitches/Shoes-T1, T3, T5; Tombstone-C00, C1, C3; Grass-YG01, YG03 

I will be filling these bags up with Halloween goodies for my two granddaughters. Have a great weekend. 

photo signaturecopy_zpsn7wywovz.png

Friday, October 14, 2022

October 2022 Picket Fence Studios Release


Hello crafty friends. It is release day at Picket Fence Studios and it's all about Christmas and Winter. 

We are celebrating the release with an Instahop on Instagram. If you want to participate in the Instahop start @picketfencestudios. There is a great prize in play so be sure to check it out. You have until Tuesday, October 18, 2022  at 11:59 CDT to participate. One winner will be randomly selected and announced on Wednesday, October 19th, 2022, on the @picketfencestudios Instagram Account.


I used the new Santa's Hot Cocoa Mug to create this no fold mug card. I cut the solid piece twice from hibiscus burst ink, then the cutout piece from white. I used the white cut out piece to as a pattern and lightly penciled the area on the two solid pieces for the cup handle opening and cut both pieces with a Fiskars fingertip craft knife. I then spot cut out from hibiscus burst and red poppy ink and the cutouts from green mini checked patterned paper and assembled all the pieces onto the mug shaped mat. I then stamped the various elements from the Build Me a Gingerbread House and cut with the matching dies and colored with Copic markers. I also cut out the small snowflakes from the mug set and the larger snowflake from the new Jolly Good Rainbow die. All the pieces were cut again from plain white cardstock and glued together to hide the ink on the back but also to reinforce them. A candy cane and larger snowflake was added to the the front of the second piece then another candy cane and berry stem to the back o the top piece. Another berry stem, two small holly leaves and a larger holly leaf and pink and white twine were added the coffee cup handle. I used layers of craft foam and Foam Tape to layer the two cup pieces together and get the separation I wanted. I stamped another berry cluster to a white cardstock piece, colored with Copic markers, then attached to the back of the piece. 

Products: Picket Fence Studios stamps and dies, Doodlebug dp, PTI cs, The Twinery twine, PFS Foam Tape, Altenew ink, Copic Markers
Copics: Candy Canes-R20, R21, R24, R27; Holly Leaves-YG01, YG03, YG25; Berries-R81, R83, R85, R46


I cut the main die from the Jolly Good Rainbow die first from a white linen cardstock card front which gave me the cutout and some of the arches. I then used the die to cut from hawaiian shores, cherry kisses and green parakeet cardstock which gave me quite a few more arches. After backing the cutout with white cardstock, I arranged the colorful arches, playing around with them, then glued them down when I was happy with the arrangement. Using the die included in the set, I cut out two sets of snowflakes which I matted together and attached to the rainbow. The sentiment from the Rockin' Around the Christmas Tree set was stamped with cherry kisses ink, cut out with the matching die and attached to the card front using foam dimensionals. As you can see here I did not use the mat portion of the die which is needed if you wanted to make a rainbow shaped card. 

Products: Picket Fence Studios stamp and dies, PTI and The Stamp Market cs, The Stamp Market ink

I will share more projects from this release throughout the month. Now go to @picketfencestudios to start the Instahop.


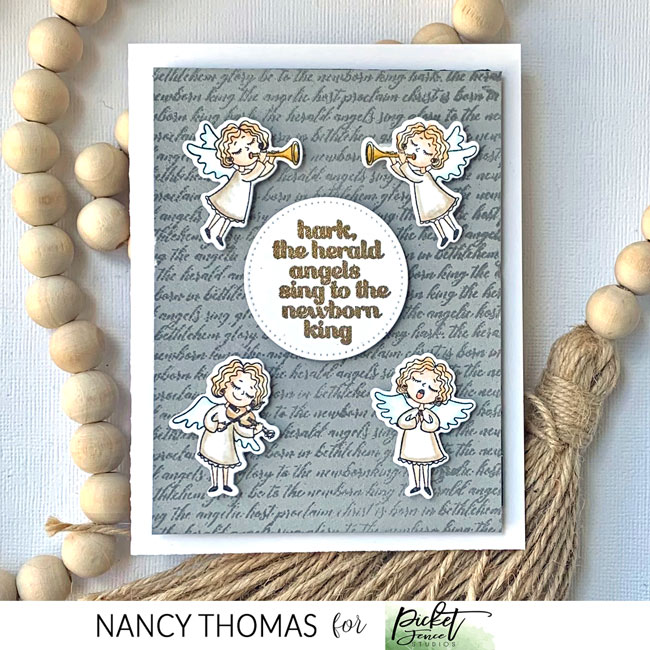
photo signaturecopy_zpsn7wywovz.png

Wednesday, October 12, 2022

Joyeux Noel {Picket Fence Studios}

I love florals for Christmas cards. This card uses products from the Picket Fence Studios September release.


I stamped the largest image from the Seasonal Christmas Flowers set onto Copic friendly cardstock, cut out with the matching die and colored with Copic markers. I used a small spatula to partially apply Winter Snowfall Paper Glaze over the Winter Rings 6x6 Stencil onto the card front piece for tone on tone texture. I added a gold metallic cardstock border strip, then stamped the sentiment from the Swanky Christmas Sentiments set using golden glitz ink. I used the More Ash Leaves dies to cut from gold metallic cardstock, then attached the flower and the leaves to the panel. I added texture to the flower center using the Winter Snowfall Paper Velvet then pounced on Golden Sparkle Paper Glitz once dried. A few sequins from the Classic Christmas Sequins set finished it up. 

Products: Picket Fence Studios Stamps, dies and stencil, PTI and Michaels cs, PFS Paper Glaze and Paper Glitz, Altenew and Delicata ink, Copic Markers
Copics: G20, G40, G43

Christmas is closer than we think!

photo signaturecopy_zpsn7wywovz.png

Saturday, October 8, 2022

Picket Fence Studios and Maker Forte Collaboration


The Picket Fence Studios (@picketfencestudios) Design Team members are collaborating with Maker Forte (@maker.forte) designers today with an Instahop.  If you want to participate in the Instahop start @maker.forte. There are prizes available so be sure to check it out. Winners will be announced October 17.


Using the
Life Changing Blender Brushes I blended on Maker Forte Palm Tree, Tiptree Jam and Blue Raspberry ink onto white cardstock, then trimmed it down. I created myown stencil by using various circles to create cutouts from a piece of acetate then blended the Snow Flurries Pigment ink in the various circles for a Bokeh look. I stamped the pair of polar bears from the A Polar Bear Christmas onto Copic friendly cardstock, cut out with the matching die and colored with Copic markers. I stamped the sentiment from the Winter Has Come to Town set onto black cardstock using Versamark ink and white heat embossed. After trimming the sentiment piece, I added the moon and stars on the back which were cut out using the Santa's Sleigh Ride Snow Globe die. Both the image and sentiment were attached to the top folding card base using foam dimensionals. 

Products: Picket Fence Studios stamps and dies, PTI cs, Altenew, Versamark and Maker Forte ink, Copic Markers
Copics: Bears-W00, E81; Scarves-B000, B01, BG02, RV52, RV55, RV17


Thank you for stopping by today and don't forget to hop on over to Instagram for a chance to win a prize and to see all the beautiful projects that have been created for this collaboration.

photo signaturecopy_zpsn7wywovz.png

Monday, October 3, 2022

Tricks and Treats

Good morning. I am taking a break from Christmas cards with a Halloween card today using products from Picket Fence Studios

I created the card front by adding a patterned paper border at the top portion and then cutting out circle with a inside/out stitched die and attaching the cellophane in the opening. I then stamped several of the small Halloween icons to the bottom along with the sentiment all from the Here for All the Boos stamp set. To create the shaker sandwich I stamped the card base with one of the ghosts also from the Here for All the Boos four times onto the card front for the backing. I filled the shaker spot with a combo of pieces from the Spooky Town Sequin Mix plus some purple pieces from another sequin mix that is no longer in stock. I added Foam Tape to the back, then placed on the card front incapsulating the shaker mix. Lastly, I cut out one of the ghosts from the Three Ghastly Friends from white textured cardstock, then added to the card front using foam dimensionals. 

Products: Picket Fence Studios stamps and dies, Doodlebug dp, PTI cs, PFS Sequins, Altenew and Simon Says ink, Copic Markers
Copics: YR01, YR02, YR04, YG01, YG03

I am submitting this to the Color Hues #50 Challenge of Orange and Purple. 


I hope you have a great week. Thank you for stopping by. 

photo signaturecopy_zpsn7wywovz.png

Saturday, October 1, 2022

Caffeinated Christmas Challenge #10 - Gnome

I am happy to be guest designing for the Caffeinated Christmas Challenge #10 today. 


To play, link up a newly created Christmas themed card with at least one gnome!  Your card can be Coffee, Tea or Hot Cocoa. The challenge runs until October 25. 


This month's sponsor is a $25 gift code to Miss Ink Stamps. You will see some of their cute products on my card today. 


I stamped the gnome image from the Miss Ink Stamps Big Mugs stamp set onto Copic friendly cardstock, colored with Copics and fussy cut out. To create the panel I used a Simon Says Wavy Scalloped Stiches die and a die from the Stitched Rectangles set to cut from white linen cardstock and patterned paper. I partially applied Picket Fence Studios Snowdrop White Paper Glaze over a Miss Ink Stamps Jitters Stencil to create a bit of "snow" on the white portion of the panel. The sentiment from the Miss Ink Stamps Season's Greetings set was stamped using Versamark ink on a red cardstock strip and white heat embossed. Both the image and sentiment strip were attached to the card front using foam dimensionals. 


Products: Miss Ink Stamps, Doodlebug dp, PTI cs, Picket Fence Studios Paper Glaze, Miss Ink Stamps Stencil, Simon Says dies, Altenew and Versamark ink, Copic Markers
Copics: Skin-E00, E01, E11, R02; Beard/Hair-C1, C3; Clothing-R20, R24, R27; Boots-T1, T3, T5; Cup-B000, B01, B04, E81
  • Please link NEWLY created cards. No backlinking.
  • Please link up cards only.
  • Any products can be used with the exception of counterfeit products. 
  • No digital projects please, only digital images that are printed and incorporated in your design.  
  • Please link back to this post and include the challenge graphic.
  • Use #caffeinatedchristmascardchallenge  #cccc10
  •  Just a reminder that cards should have a definite Christmas theme along with at least one gnome.
I hope to see you in the gallery.

photo signaturecopy_zpsn7wywovz.png